All the Minecraft potion recipes you need to survive
Here's how to brew the best Minecraft potions.
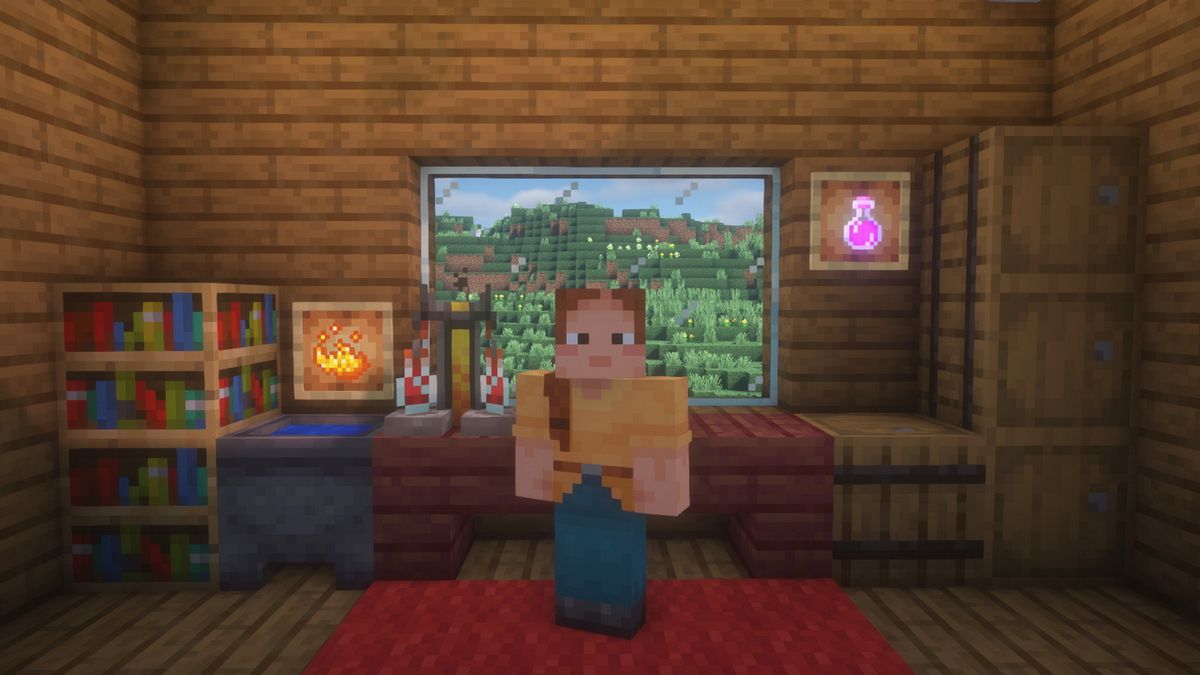
Fancy creating your very own Minecraft potions? While we can't vouch for how they taste, these useful concoctions can be made out of some of the more unusual ingredients in Minecraft, but will grant powerful effects that will help you survive and thrive while fending off all the deadliest mobs. Would you like to explore the seafloor by breathing underwater? Or maybe you've taken too many dunks into lava lakes, and need resistance to fire? And of course, there's always some good old fashioned healing potions. Powerful and useful, Minecraft potions belong in every proper adventurer's inventory while they're exploring the world and gathering materials.

Minecraft update: What's new?
Minecraft skins: New looks
Minecraft mods: Beyond vanilla
Minecraft shaders: Spotlight
Minecraft seeds: Fresh new worlds
Minecraft texture packs: Pixelated
Minecraft servers: Online worlds
Minecraft commands: All cheats
Minecraft build ideas: What to build next
But vast alchemical power doesn't just grow on Minecraft trees, so to brew up these mixtures you're going to need special brewing equipment and the proper knowledge. Thankfully, we're here to give you the rundown on the full Minecraft potion list, and how to get started brewing them.
While you're gearing up, if you're looking for extra protection to keep you safe on the hunt, consider some of the best Minecraft enchantments to make your armor, weapons, and tools sparkle. And of course, if you've got some, crafting your gear from Minecraft Netherite is another step up in power as well.
Getting started with Minecraft Potions
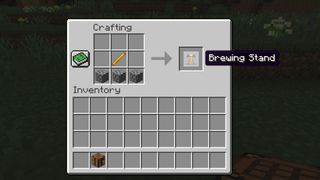
If you're wondering how to make Minecraft potions, the first step is to get yourself a Brewing Stand. Unlike many other basic crafting and refining stations—like the Furnace, Smoker, and Stonecutter—you'll have to venture into the Nether to a Nether Fortress to find Blazes to kill for their Blaze Rods.
The Brewing Stand can be made by combining one Blaze Rod with three bits of Cobblestone. You need to place the Blaze Rod in the center and the Cobblestone along the bottom row. Blaze Rods can be found by killing Blazes in Nether Fortresses, and it's worth picking up as many as you can since Blaze Rods are broken down into Blaze Powder to fuel your Brewing Stand.
What else do you need for making Minecraft potions?
While the Brewing Stand is the core thing you need in your quest for Minecraft potions, there are other useful—and required—things to gather. Here's the most important of the supporting cast for your brewing adventures:
- Cauldron: This is used to hold water, which you use to fill the Glass Bottles before you start brewing. You can also use a water source instead of the Cauldron, if you're short on Iron.
- Blaze Powder: This the fuel for the Brewing Stand, nothing else will work in its place. Each Blaze Rod you acquire can be turned into two Blaze Powders, so be diligent in acquiring them.
- Glass Bottle: These are the containers for your potions.
- Water Bottle: This is the starting base for all potions. You get it by filling a Glass Bottle from the Cauldron or any water in the world.
- Nether Wart: This is the most basic of potion ingredients, so make sure to grab some along with Soul Sand when you visit the Nether. If you do, you can grow your own back at home.
How to make Minecraft potions
Now that you've got your basics, it's time to cook up some Minecraft magic.
Along with the fuel to the Brewing Stand you need to get started, you're also going to need some Water Bottles, and some Nether Wart.
The biggest gaming news, reviews and hardware deals
Keep up to date with the most important stories and the best deals, as picked by the PC Gamer team.
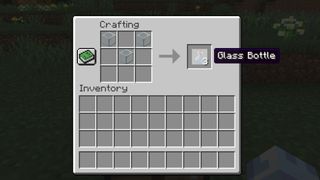
To make Water Bottles, first craft Glass Bottles by combining three blocks of Glass on a crafting table. These must be arranged in a V shape, though it doesn't matter if the bottom piece is in the bottom row or the middle. Then, take your bottles to a water source and use them on the water.
Next is the Nether Wart, which you can get by finding it in The Nether. Once you've got some to start, you can create your own farm anywhere—including the Overworld—by laying down some Soul Sand and planting the Nether Wart in it to grow.
Now that's settled, we can return to brewing. Lets walk through the process:
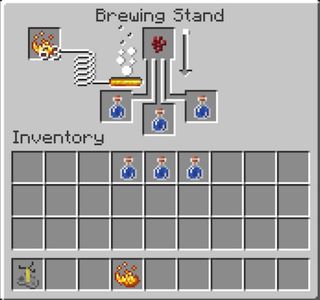
- Start by fueling your Brewing Stand by placing Blaze Powder in the top left.
- Then you should add up to three Water Bottles to the stand. Three is optimal, as it doesn't cost any more resources to brew three instead of one or two.
- Next up, you add a Nether Wart up top in the final spot.
- Now you have to wait 20 seconds for the process to finish.
- Once the process has completed, you'll get three Awkward Potions to use for the next steps. On their own these potions are useless, but they're also the main component of most potions, and you can't use Water Bottles for the following steps.
There are two basic ways to modify your awkward potions so they do something. It doesn't matter what order you do these steps in, so feel free to do whichever you'd like first and second—but you can't repeat a step on the same potion.
Adding the base ingredient
The first option is changing how the potion works at a base level, such as making it last longer, or making it more potent. Lets look at the list of base ingredients first:
| Base Potion | Required Ingredient | Modifier effect |
|---|---|---|
| Mundane Potion | Redstone Dust | Extends potion duration |
| Thick Potion | Glowstone Dust | Increases potency but reduces duration |
| Potion of Weakness | Fermented Spider Eye | Gives opposite effect |
| Splash Water Bottle | Gunpowder | Spreads effect when thrown |
| Lingering Water Bottle | Dragon's Breath | Creates cloud of effect when thrown |
Pick the base ingredient you want, and then you can move on to the next brewing step. Here's how the process works:
- First, you want to make sure you have fuel, which you can see in the small orange bar, or if it's empty you can add Blaze Powder to the top left.
- Next up you put your in-process potions in the bottom three slots. Just like the first step of the process, it's most efficient to do three at a time.
- Then you put your desired base ingredient in the top center to start the process.
- You'll have to wait 20 seconds for the brewing to finish.
Adding the effect ingredient
Effect is the other thing you change about Minecraft potions, and these are provided by combining potions with different ingredients. You just need to put the potion in the Brewing Stand, and add the relevant ingredient to it. Once you've added an effect ingredient, the potion will be useful, though it doesn't have to be finished since you can still add a base ingredient if you haven't already. To create potions with opposite (corrupted) effects, add a Fermented Spider Eye. Here, we’ll run through all the Minecraft potion recipes, with what ingredients you’ll need and what they do in our trusty Minecraft potions chart:
| Effect Potion | Required ingredient | Potion effect | Corrupted effect |
|---|---|---|---|
| Potion of Swiftness | Sugar | Increases speed | Potion of Slowness |
| Potion of Leaping | Rabbit's Foot | Increases jump height | Potion of Slowness |
| Potion of Healing | Glistering Melon Slice | Restores hearts | Potion of Harming |
| Potion of Poison | Spider's Eye | Depletes hearts over time | Potion of Harming |
| Potion of Water Breathing | Pufferfish | Breathe underwater | None |
| Potion of Fire Resistance | Magma Cream | Grants fire resistance | None |
| Potion of Night Vision | Golden Carrot | Increases nightime visibility | Potion of Invisibility |
| Potion of Strength | Blaze Powder | Increases melee damage | None |
| Potion of Regeneration | Ghast Tear | Restores health over time | None |
| Potion of Turtle Master | Turtle Shell | Increases defense while slowing speed | None |
| Potion of Slow Falling | Phantom Membrane | Fall slower | None |
- First, you want to make sure you have fuel, which you can see in the small orange bar, or if it's empty you can add Blaze Powder to the top left.
- Next up you put your in-process potions in the bottom three slots. Just like the other steps of the process, it's most efficient to do three at a time.
- Then you put your desired effect ingredient in the top center to start the process.
- You'll have to wait 20 seconds for the brewing to finish.
What is the best Minecraft potion?
A potion doesn't have to be glamorous to be useful, and staying alive is pretty much essential to doing well. Whether you need a quick boost in a scrap, or if you're just trying to recover after it's over, lots of potions can help you come out on top.
Personally, I think the Potion of Regeneration is the most universally useful, since it heals you so much and keeps working while you fight—or run from—whatever damaged you. You can even make the splash version to help out your friends in a pinch.
If you're gearing up for a big fight, the Potion of Strength can be a huge boon, really powering up every swing of your weapon and helping you take down tough enemies before they can kill you.
Of course, if you're clumsy like I am, the honest truth is that the Potion of Fire Resistance is the best. Every dip into the lava while traversing the Nether or mining deep underground gets a lot less frustrating when you can swim around, happy as a fiery clam.
But go forth, and decide for yourself! Every potion has an important use.
Minecraft servers: The best blocky worlds
Minecraft house: Ideas for some gorgeous new builds
Minecraft builds: 15 of the most impressive creations
- Sean MartinSenior Guides Writer
- Stacey Henley
- Sarah RichterContributor
Most Popular


