You Can Switch to Linux!
Getting Started
With modern tools, getting Linux on your hard drive is simple--at least compared to the bad old days
If you’re like me, you’ve probably installed Linux a few times, mucked around with it for an hour or two, changed the theme, and maybe browsed the web a little. Then, when it was time to work, you jumped back to Windows, and all was right with the world.
Things are much easier now than they were in the early days of Debian, Slackware, and Red Hat. Modern distros such as Ubuntu and SUSE LED install with crucial applications (web browser, photo editor, email client, word processor, etc.) and support for most hardware out of the box. With Ubuntu, you can boot off the CD to determine whether or not your rig will work with the OS before you make a single change to the hard drive. You can tell if you’re going to have a problem before you hose your system, which is always a good thing.
Before we get started installing Ubuntu, feisty fawn, you’ll need to download the appropriate ISO file from the Ubuntu downloads page and burn it to disc. For neophytes, we generally recommend starting with the x86 versions, even if your CPU supports AMD64 extensions. The proper file name for most people will be ubuntu-7.04-desktop-i386.iso.
To burn the disc, you can use commercial burning software (like Nero) or download and install the free ISO Recorder software. It’s also a good idea to run a backup before you get started (or anytime you muck around with your partitions, for that matter).
There are two ways to make space for your Linux install: You can delete an unused partition or let the Linux installer resize an existing partition. If you have an unused partition on your hard drive that you want to use for Linux, it’s a good idea to remove that partition before you start the install process, since Linux can’t install to an NTFS partition. We recommend dedicating at least 20GB of space for your Linux install. To get rid of the partition, open the Computer Management tool in Windows and delete that partition. In Linux, you’ll have a tough time telling which partition is which, so to avoid heartbreak, do your deleting in Windows. If you don’t have an unused partition, we’ll talk about resizing your existing partition during the Linux install portion of this story.
The First Boot
Once you’ve burned the ISO, you’ll need to boot your PC from the Ubuntu CD, which will involve either manually selecting the optical drive or changing the boot order in your BIOS. After several minutes, you should see the basic Ubuntu desktop. You should have access to most of your hardware, including network, sound, and graphics. Some typical gaming components simply don’t have good Linux support—notably the X-Fi series of soundcards and GeForce 8800–family videocards. We’ll talk about them in a bit.
Keep up to date with the most important stories and the best deals, as picked by the PC Gamer team.
Install!
Assuming you booted into the live desktop properly, starting the install process is as simple as double-clicking the Install icon on the desktop. The install program will prompt you for your language, location, and keyboard layout before you get to the hard-disk partitioning section.

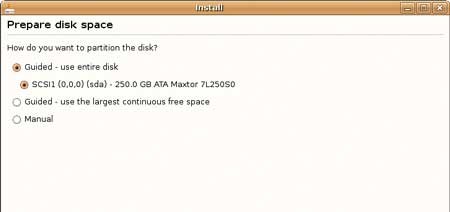
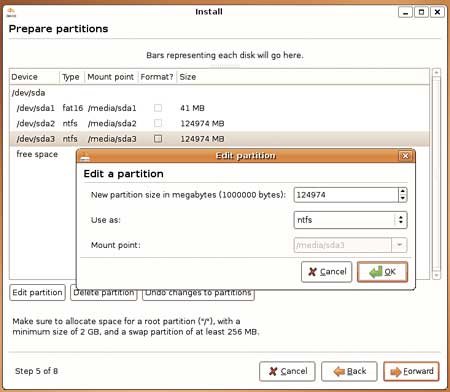
Partitioning your hard disk is the only step of the install process that has the potential to do serious harm. If you install to the wrong partition, you could accidentally nuke your Windows drive and all of its contents (that’s why we recommend running a full backup before you start the install process). The safest way to install is to add a new hard drive or just create free space on the disk—however, that’s not always an option. If you want to resize your existing partition, select the Manual option. Select the partition you want to resize and click Edit Partition. Then input the new size for the partition in megabytes (leave the other settings alone) and press OK. Next, you’ll need to create a swap partition. Highlight the newly created free space, click New Partition, set the size to 2,000MB, and choose Swap. Click your free space once again, then New Partition, and change the mount point to /. Leave the other settings alone and press Next.

Now you’ll be prompted to import data from your Windows partition. The Ubuntu installer will pull your Gaim settings, Firefox bookmarks, music, photos, and documents over from your Windows install if you select these options. I had mixed results with this tool in the early build of Feisty—it crashed the installer on a few Vista machines we tested—but your mileage may vary. After you import files, you’ll be prompted to create a user account. You’re almost done!
The final step is to confirm your installer’s settings and press Install to finish the process. You’ll need to wait 20–40 minutes while the install completes and then finish by rebooting your PC and selecting the Ubuntu entry from the boot manager that was installed.

