How To Set Up NIC Teaming (Link Aggregation)

There are times when having a bit more performance is better. Actually, who are we kidding? Having more performance is always better. In the case of networking, this is especially true. You can never have enough bandwidth. There will be some, though, who argue that x number of megabits or gigabits per second is "more than enough." We refer to this as the "640KB mentality."
All of today's motherboards ship with at least one gigabit Ethernet port. Some premium boards come with two. Of course, you can always add more by installing add-in NICs, and there are motherboards with more than two, but for the sake of this article we're referring to consumer motherboards.
So, what exactly is link aggregation? In a nutshell, link aggregation (or trunking), is the fine, delicate art of combining two or more physical Ethernet links into a single logical link. So if two 1Gb/s ports were aggregated, you would get a total aggregated bandwidth of 2Gb/s. Note that we use the phrase "aggregated bandwidth."
Think of link aggregation in terms of network link resiliency rather than total available throughput. In that sense, if one physical part of the logical link fails, traffic will failover to the remaining active links. Where you will see increased bandwidth is when you have multiple origin-destination IOs. For example, if you're transferring a file from one PC to another over a 2Gb aggregated link, you'll find that the total maximum transfer rate will top out at 1Gb/s. Start two file transfers, however, and you'll see the benefits of aggregated bandwidth. In simple terms, link aggregation increases the number of lanes on a highway but it doesn't increase the speed limit.
What this equates to is if you want true higher throughput, moving to a fatter pipe—like 10GbE—is the only way to go.
For the majority of home networks, setting up link aggregation serves little to no advantages. However, if you're employing a NAS that has multiple Ethernet ports, it may support link aggregation and you'll have some benefits there. So, how do you do it in a network?
First, you're going to need a switch/router that supports link aggregation (LACP, 802.1ax/ad, etc.). Unfortunately, most consumer-level switches and routers do not support link aggregation, so you'll have to link into business-level products, which will carry a premium.
The biggest gaming news, reviews and hardware deals
Keep up to date with the most important stories and the best deals, as picked by the PC Gamer team.
Second, your PC needs to have two Ethernet ports, and whatever device you want to connect to needs to have at least the same. Assuming you have the hardware requirements covered, you'll need an operating system that supports it. Windows 7, 8.1, and 10 for consumers don't have link aggregation features baked into them. Microsoft requires that you use Windows Server instead, or you'll have to use vendor-supplied drivers that have link aggregation features (such as Intel PROSet tools). Linux and OS X have built-in link aggregation features.
After you've satisfied all the prerequisites, here's how to do it.
We used the following setup:
| Test bed | |
| Motherboard | ASUS Rampage IV Black Edition |
| CPU | Intel Core i7-3970X |
| RAM | Samsung "Green" DDR3 32GB |
| SSD | Samsung 850 Pro 1TB x4 (RAID 0) |
| OS | Windows Server 2012 R2 OS X 10.10.5 |
| Switch | Netgear ProSAFE XS708E 10GbE |
| NIC | Small-Tree Dual Port 10GBASE-T P2E10G-2-T |
| Cable | CAT7 (7ft |
Configuring the network
First, our NIC is a 10GbE Ethernet adapter from Small Tree that's fully compatible with Windows, OS X, and Linux. You can get a 10GbE adapter with SFP+ connections, but for the sake of network compatibility, Small Tree sent a 10GBASE-T (RJ45) version.
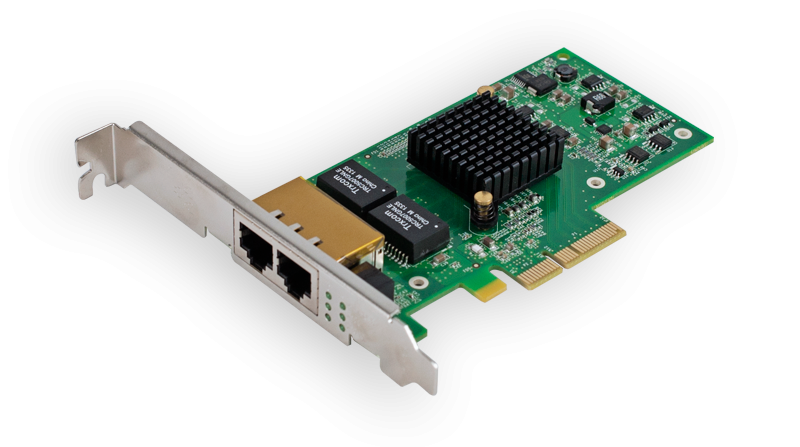
If you're going for the ultimate in performance though, we recommend going with SFP+ connections, as 10GbE pushes the limits of CAT6 and RJ45 connectors. Small Tree also has SFP+ adapters available if you want that kind of setup. Keep in mind that SFP+ switches are even more expensive than RJ45 switches.
Next up: setting up the switch. You'll need a switch that supports link aggregation, whereby there's management capabilities that will allow you to bond individual ports. The Netgear ProSAFE XS708E comes with a utility that allows you to bond specific ports.
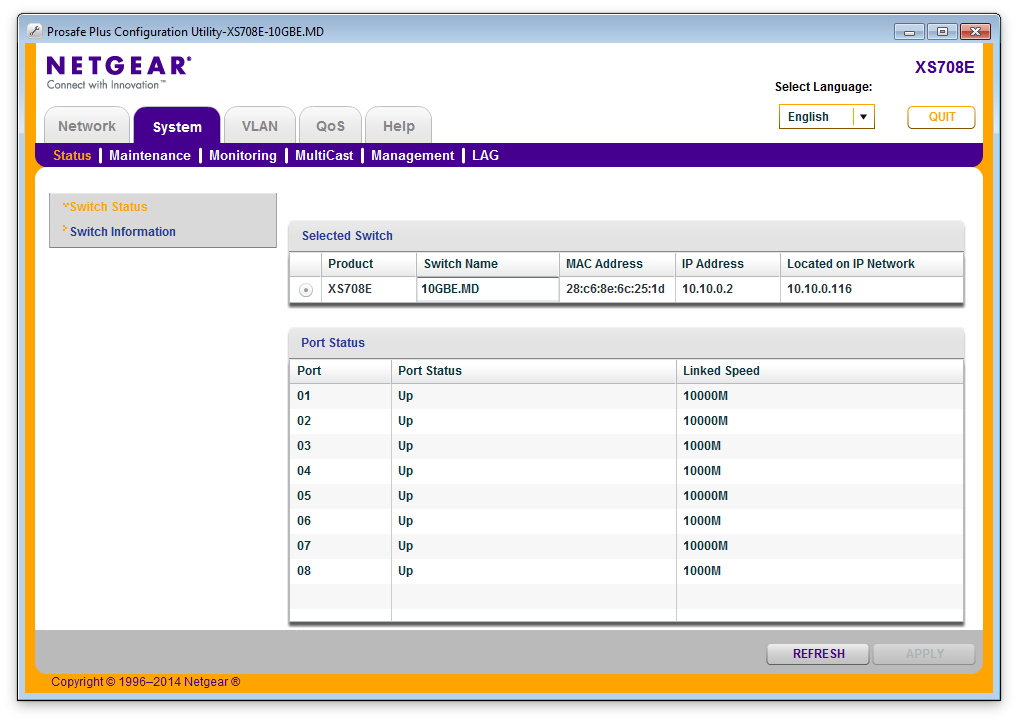
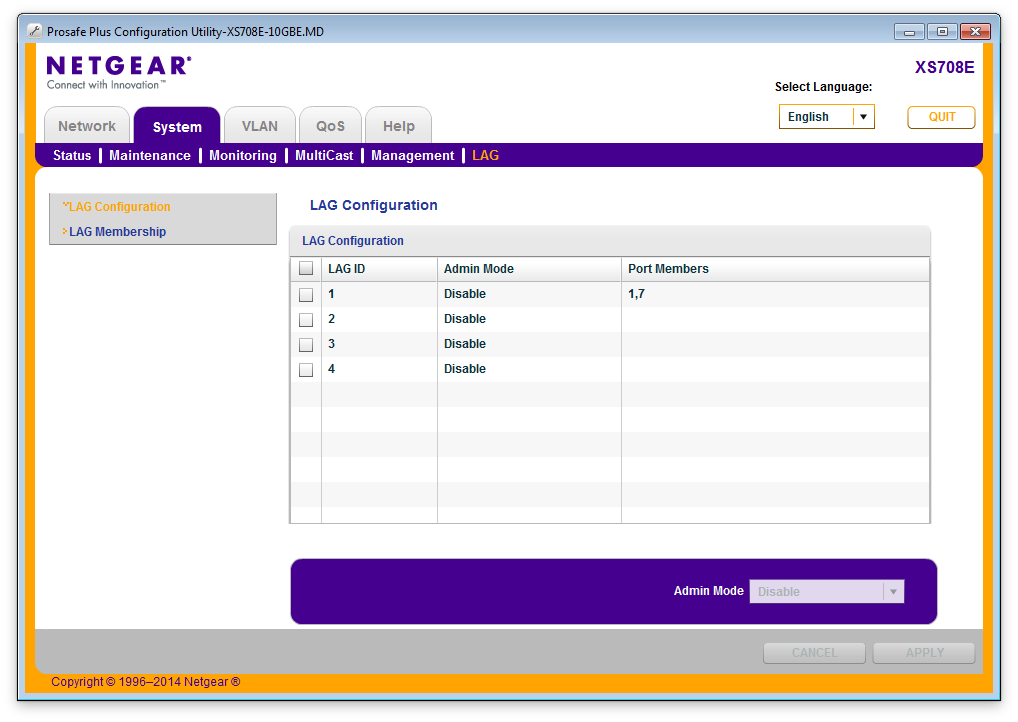
Depending on your switch, you'll have something similar for teaming up ports like what you see in the image above. The above switch isn't a managed switch, so the tool to set this up comes separately as a standalone application. Your switch may have a web interface.
Windows Server 2012 R2
Unfortunately, NIC teaming isn't natively available in consumer versions of Windows, so we'll have to use Windows Server and in this case, it's Server 2012 R2. To do this in Windows Server, open the Server Manager. From there, click "Local Server" and you'll see an option called "NIC Teaming."
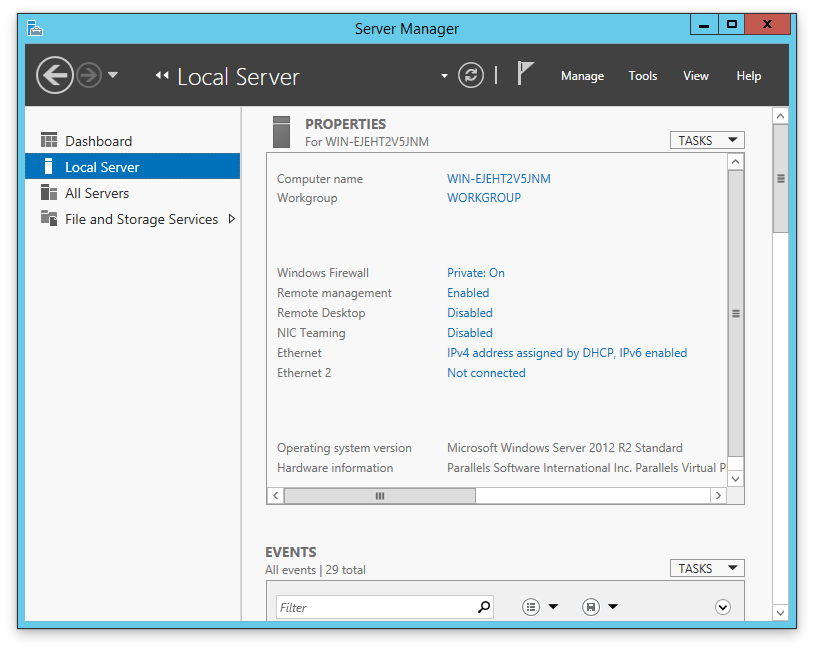
Click the option that says "Disabled" and you'll be presented with the teaming configurator:
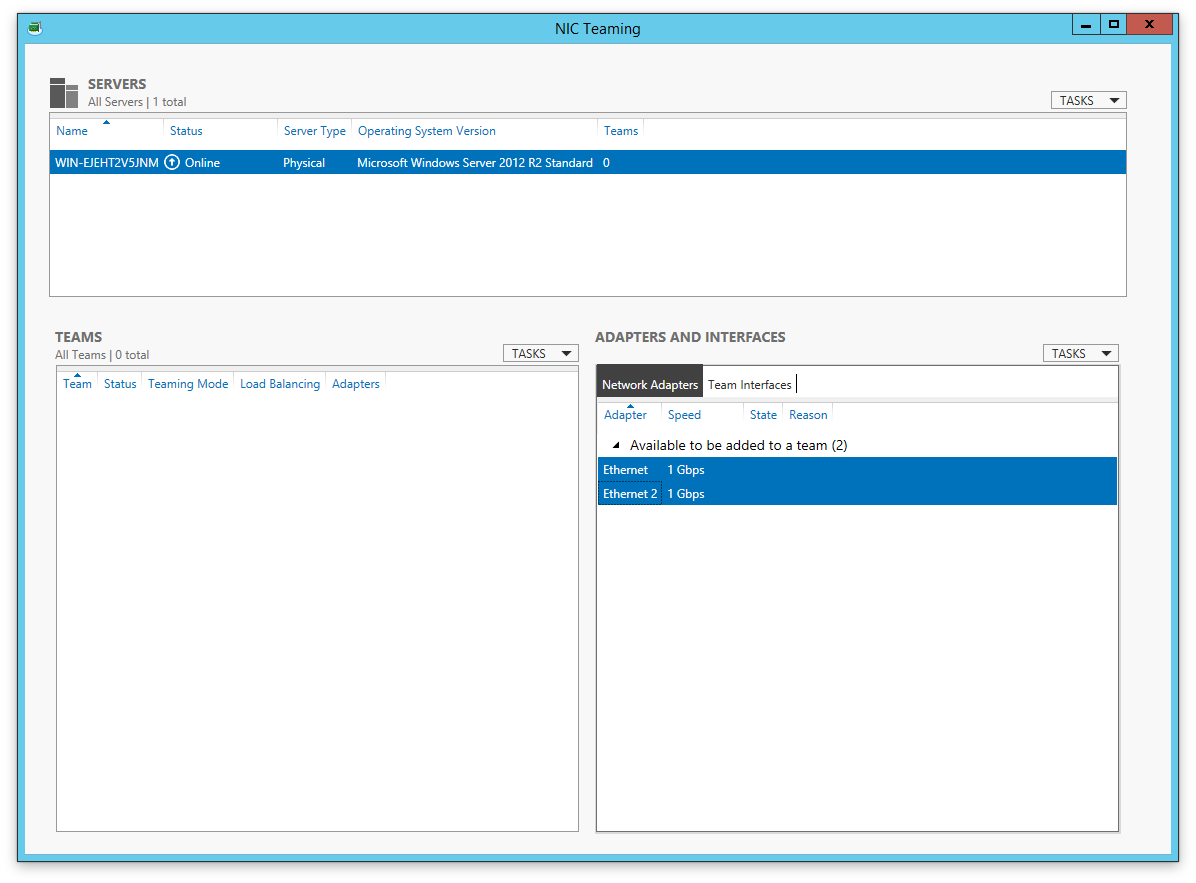
You'll see both of your NIC interfaces listed under Adapters and Interfaces. Now, select both interfaces, right click, and select "New Team." In the window that pops up, you'll be given a field to name the new logical interface, as well as to select additional properties related to protocol. The protocol you choose depends on the type of switch you have. Give it a name and click OK.
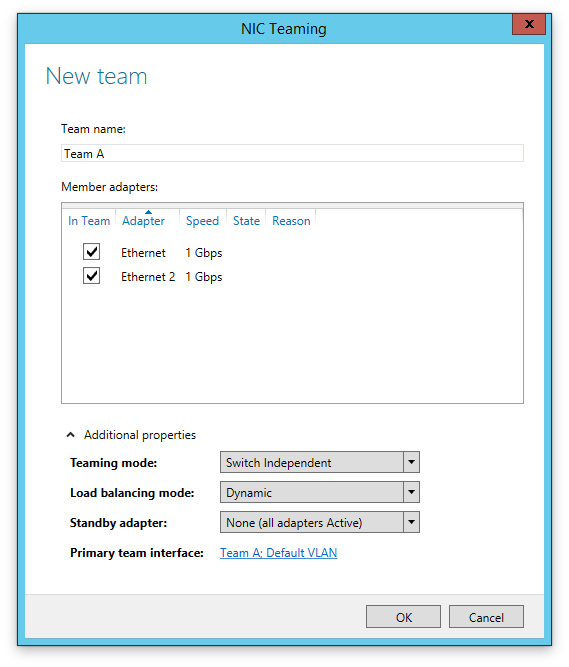
For maximum compatibility, select "Switch Independent" under Teaming Mode. Once that's done, you'll end up back in the main NIC Teaming window where you'll see your newly named logical interface comprising your two physical interfaces. Easy!
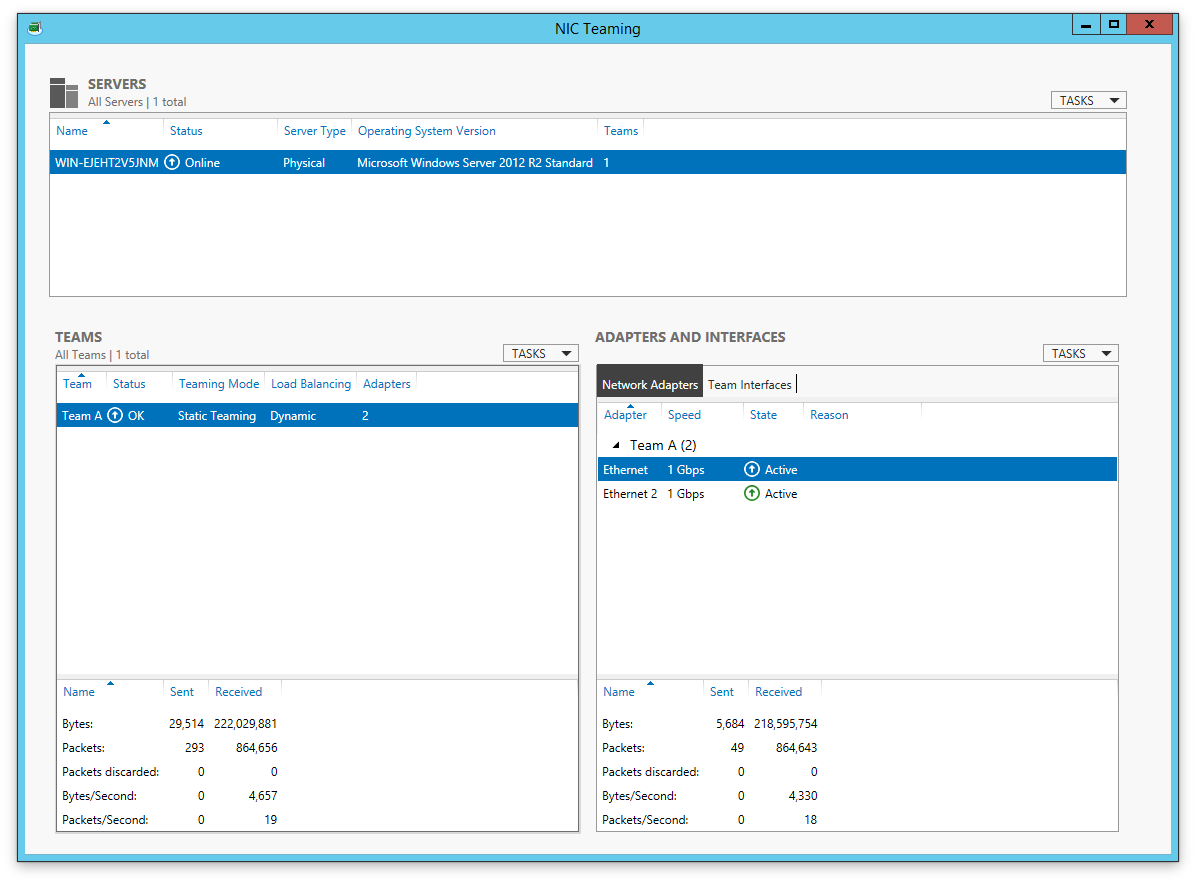
If all goes correctly, both your physical connections will indicate an active state, and you can see the transmission details below, although there's no stat for packets lost.
OS X
In OS X, setting up an aggregated link is a bit more straightforward, and doesn't require special tools or third-party drivers—the feature is baked into the default Network preferences. To set it up, open System Preferences and go into the Network options.
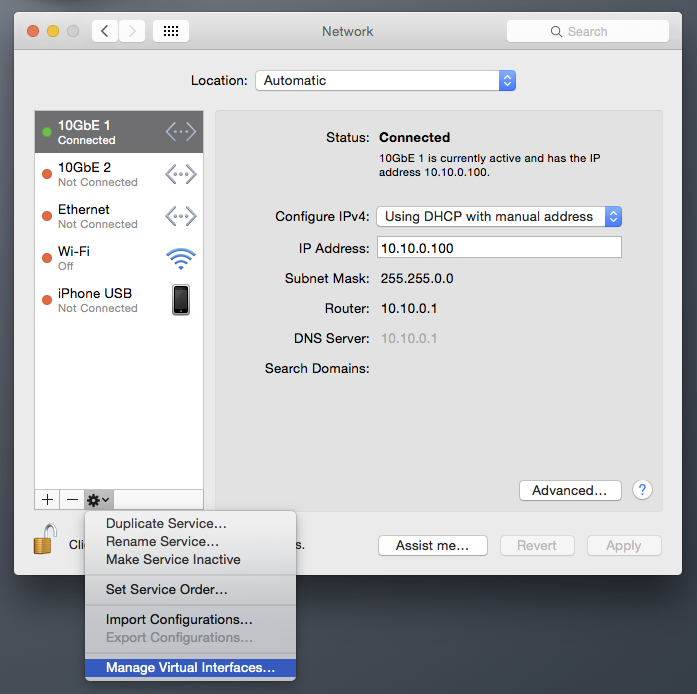
You may have to click the padlock icon to make the options available. Click the small gear icon and select "Manage Virtual Interfaces..."
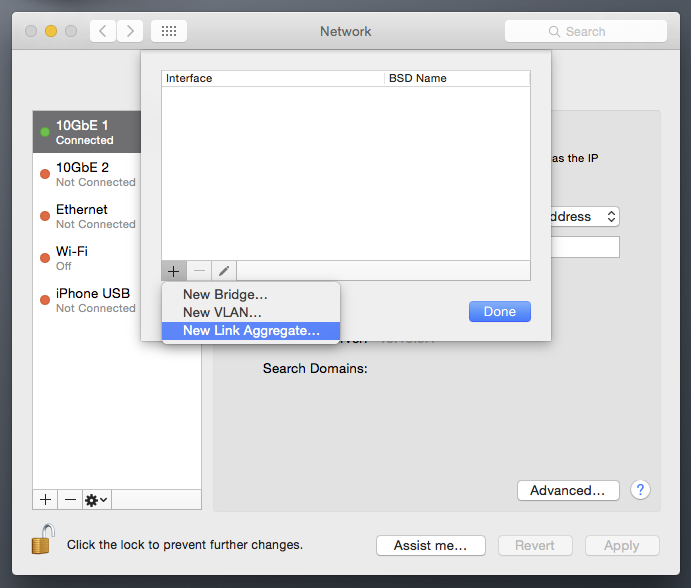
A drop-down menu will appear. Click the + button and select New Link Aggregate. You'll be presented with a list of your physical interfaces, where you can select the ones you want to bond. Tick the boxes for the interfaces you want to combine, and select Create. Don't forget to give it a name.
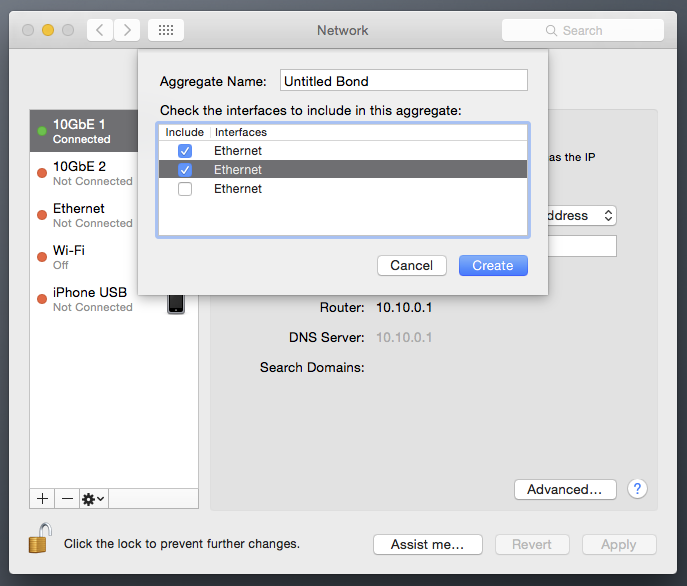
If all goes well, the two or more physical interfaces you bonded will disappear from the Network interfaces list, and instead be replaced with the logical bond you just created. It's especially good if the light turns green.
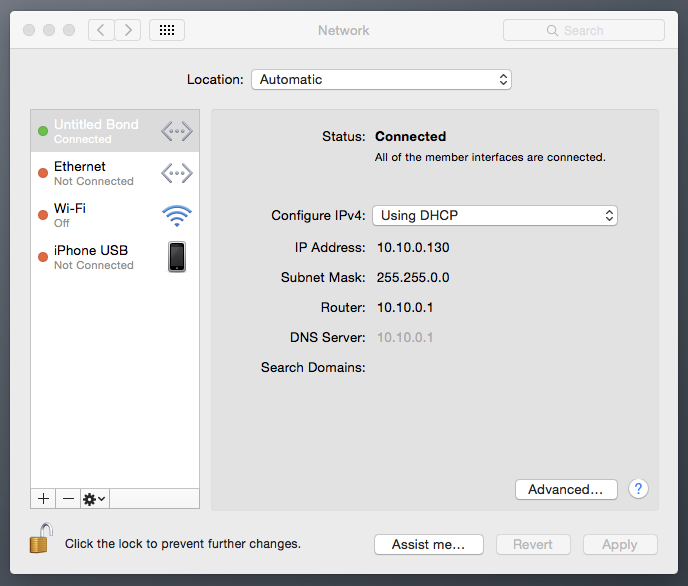
To see how your connection is doing, select the logical interface and click Advanced. You'll be able to see its status as well as configure other options such as IP address, DNS, etc.
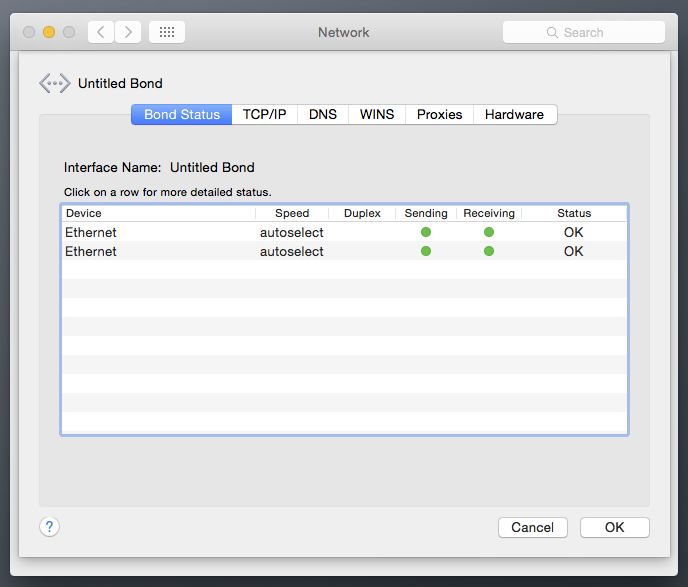
To remove the aggregated bond, simply select it in the main Network interfaces window and click the minus (-) button. You'll then need to re-add the individual physical interfaces.
Linux
One could say that the Linux environment is the most straightforward of all OSes in which to create a logical bond. Open a terminal window (and of course, the same commands apply if you're not using a GUI), and type in the following:
Here's a breakdown of what that command means:
modprobe bonding: this loads the bonding driver.
bond0: the name we gave the logical interface.
The third line tells the system to turn on (up) the logical interface.
ifenslave: this tells the bonding interface to aggregate interfaces eth1 and eth2.
If you want to configure how the bonding actually operates, you'll want to modify the /etc/modprobe.conf file to include the bond you want to create and define its properties. Open the .conf file and add the following lines:
max_bonds: defines the number of bond interfaces to create.
mode: defines bonding policies such as round-robin, etc.
miimon: defines the frequency in milliseconds that link monitoring will occur for high availability failover.
To see how your bond is operating, issue the following command:
And you should get the following output:

