How to overclock your AMD processor
Know your limits
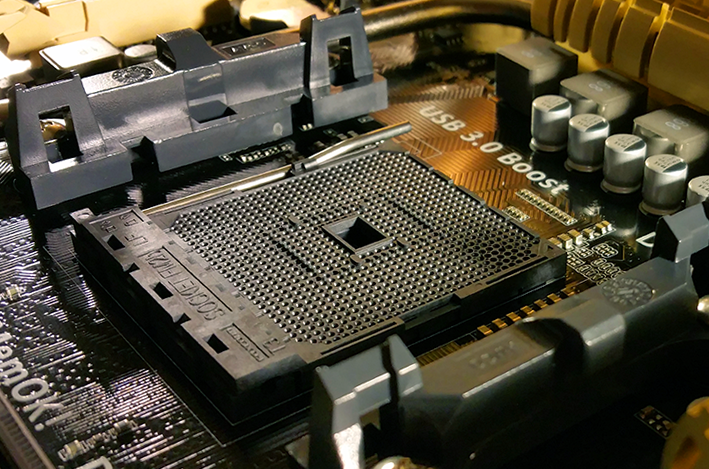
FM2+ is a tweaking dream platform aimed directly at budget-conscious gamers. APU setups have plenty of clocks to crank and enough headroom to keep enthusiasts happily twirling dials for a month of weekends. Intel offers better overall performance, but Skylake’s more restrictive platform experience and higher costs take a lot of fun out of the tuning and exploration process.
That said, there are some limits to keep in mind when overclocking Godavari. The upper ceiling for stable CPU core performance is around 4.6–4.8 GHz, with the integrated GPU giving up at 1Ghz and memory flaking out beyond 2400MHz. Higher numbers are possible with pricey cooling solutions or excellent samples, but this represents the bulk of Godavari’s meaningful potential, and performance gains trail off sharply past this point.
Setting the Stage
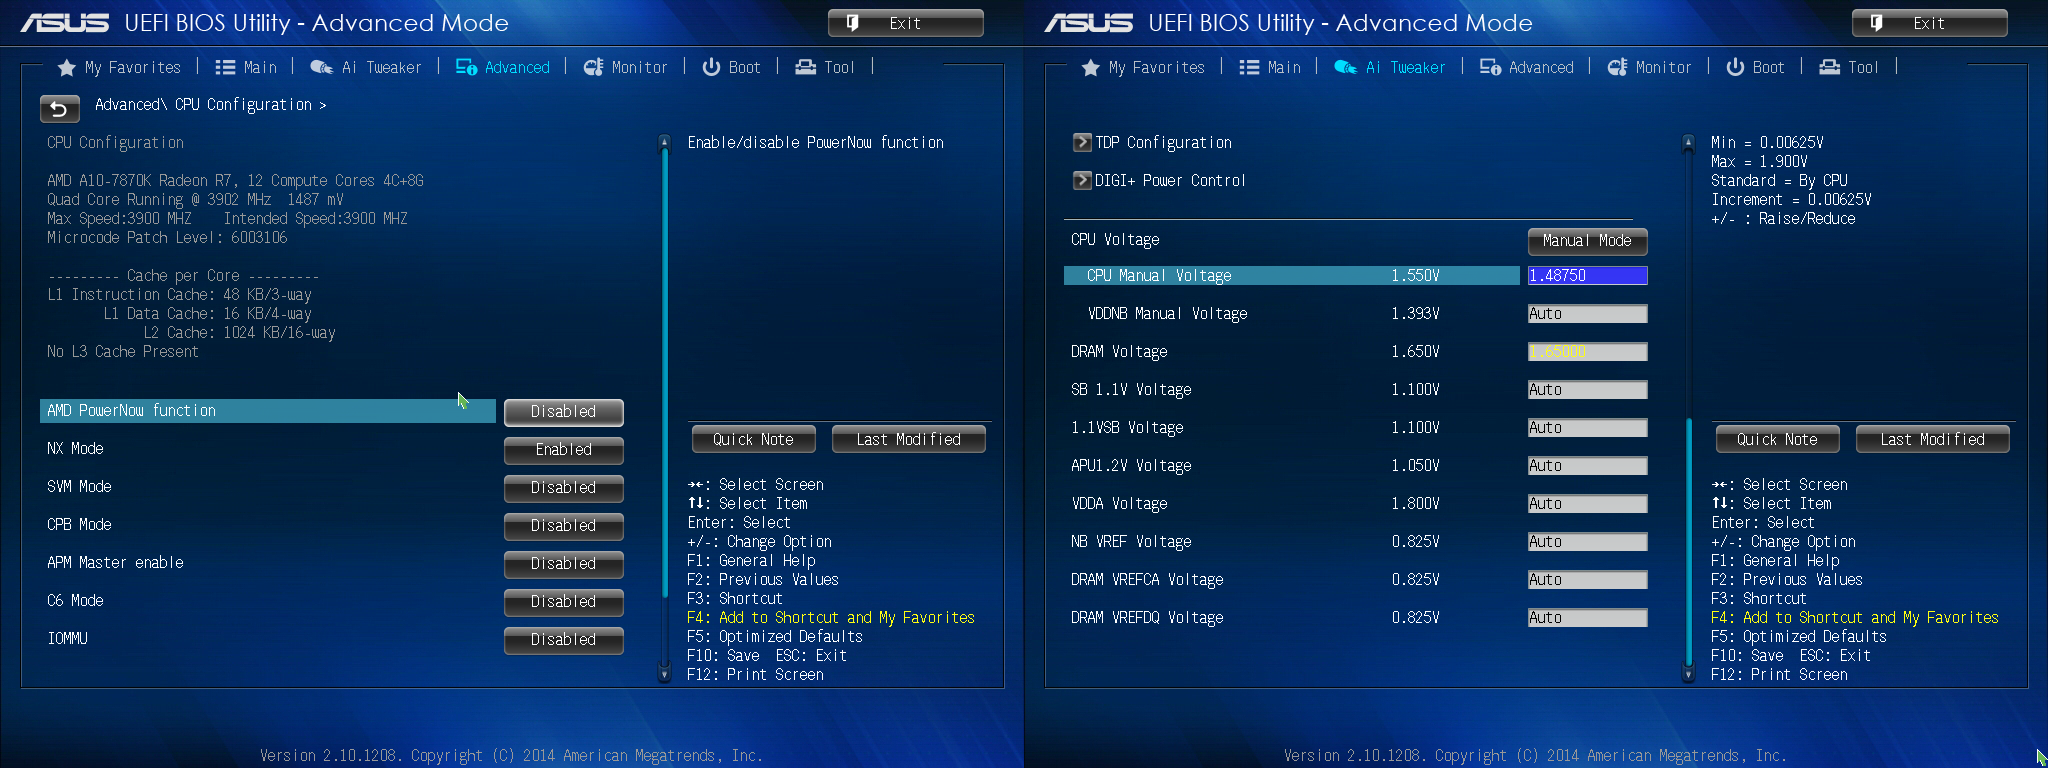
To prep, disable turbo and sleep modes in BIOS and set a manual voltage of 1.48, which is default for the A10-7870K. Remember that other APUs will be able to handle different voltages; Kaveri defaults at 1.35 volts.
Leave the BCLK at 100 for now and select “Auto” for memory and Northbridge speeds. Integrated GPU settings should be left at 866 (default) or auto. Most of these numbers will see a bump later, but first we need to establish the CPU’s top operating frequency.
Next, change Load Line Calibration (LLC) to “high” for the CPU and the CPU/NB. Raise the current capability of both to 110–120% to cover any potential overclocking needs. Also set DRAM phase control to High. Some of these options will increase CPU temperature, but Godavari’s superior thermal characteristics mean heat isn’t as big a problem for the platform as in the past. Thermals should remain manageable assuming you're using a decent cooler.
Multiplier Manipulations
Starting with 42 (one over turbo), gradually increase the multiplier and test the results after each change with a quick benchmark using a system tool like AIDA64. APUs at the limit frequently display soft crashing behavior, such as application abnormalities or drops to the desktop, rather than blue screens or hard reboots, so stick around to observe a few benchmark runs for any glitches that indicate instability that won’t show up on test results.
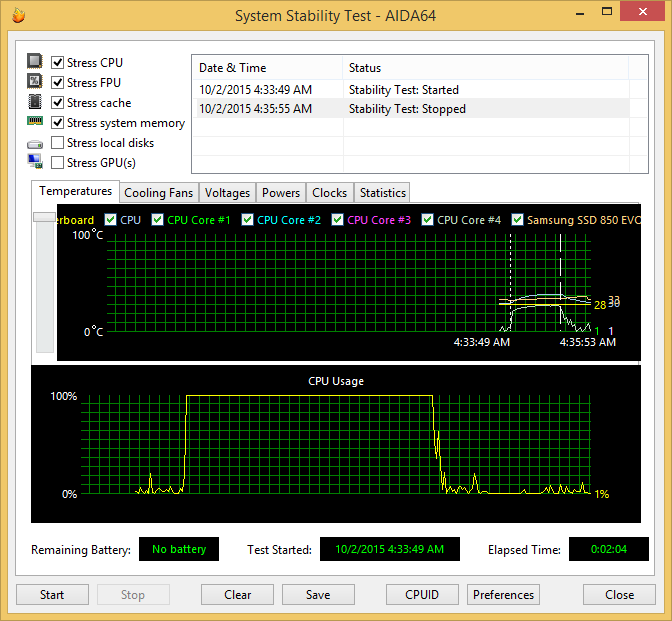
Overclocked APUs are power hungry so if you start experiencing lock-ups while testing, try increasing voltage to the CPU slightly. This should help stabilize borderline overclocks. Don’t push Godavari vcore past 1.53–1.55 to avoid damage to the CPU.
The biggest gaming news, reviews and hardware deals
Keep up to date with the most important stories and the best deals, as picked by the PC Gamer team.
Problems generally start to creep in around 4.5 GHz. Find the sweet spot and stress test with AIDA64’s system stability tool. Once you have a stable multiplier, reduce it by one to share a bit of overhead with the rest of the APU’s subsystems and reboot into BIOS.
Now it’s time to tune memory.
Total Recall – Memory comes before iGPU
DRAM speed increases take priority over iGPU clock tweaks on all APUs since the Radeon cores are merely loafing at default desktop DDR3 frequencies. Look for motherboard-certified kits in the 2400 MHz range and don’t rely on built-in timing profiles for stability. You may need to enter the values manually for proper operation.
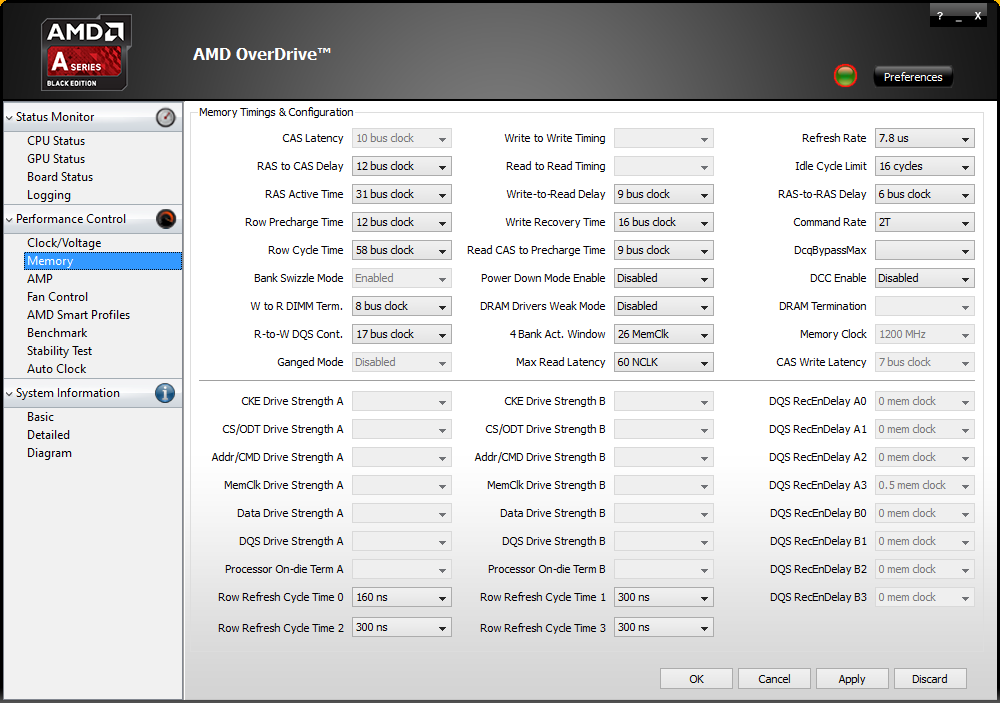
When all else fails, try loosening the primary timing values a little before reducing speed. Latency is less important than bandwidth for overall APU performance. Keep in mind that FM2+ only supports up to 2133 DDR3 officially, with provisions for 2400 dependent entirely on BIOS. For memory speeds beyond 2400 MHz you’ll need to tweak the BCLK speed past 100.
Godavari’s IMC (Integrated Memory Controller) is an incremental improvement over previous iterations but remains one of the weaker aspects of the architecture. Fast memory support is hit and miss, a shame since these processors thrive on bandwidth. Switch slots or reduce from four sticks to two when dealing with uncooperative DRAM situations. Consider a dedicated overclocking stress utility if issues persist, as these can expose subtle problems hidden by more general system tests. Another trick is reducing DIMM voltage to 1.5, which lowers pressure on the IMC and can improve results.
Once memory speeds are set, it’s time to see what the iGPU can pull off with whatever headroom remains. While the A10-7870K defaults to an already speedy 866 MHz, jumps past 1.1 GHz are possible with Northbridge voltage increases to the 1.27–1.3v range. Settings around 1 GHz are more likely to be successful however, so start with 950 MHz and go up from there.
Unigine’s Heaven or 3DMark’s Firestrike are good iGPU stability tests; both tend to quickly quit or freeze up when run with borderline overclocks, but many in-game benchmarks such as the ones found in GTA V or Bioshock Infinite also work well.
Polished Performance – BCLK tuning, RAM latency and Northbridge
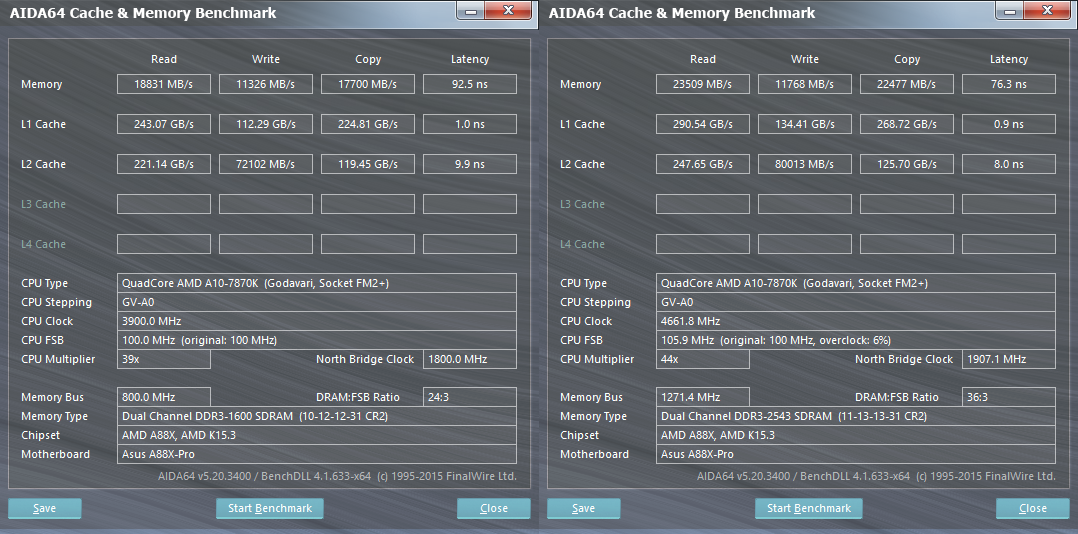
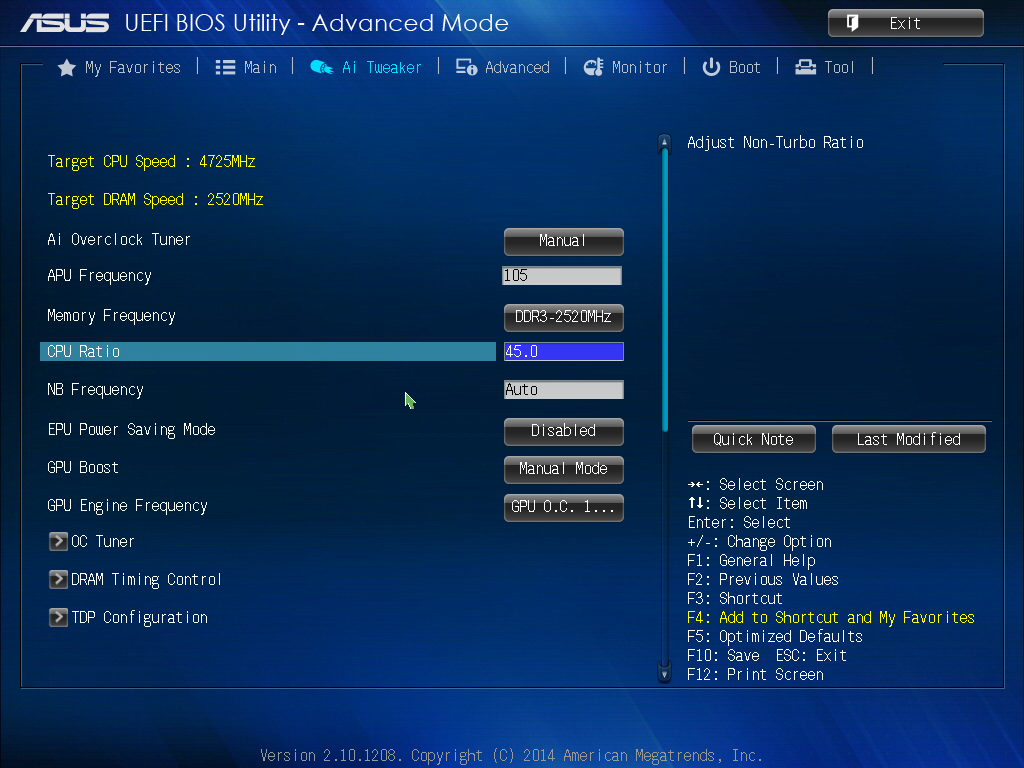
Most of the gains from here on out deal with fine tuning and provide comparatively minor benefits, but are worth consideration for dedicated enthusiasts. BCLK adjustments allow DRAM to go beyond the chipset’s 2400 MHz maximum specification, but don’t expect to jump all the way to 2600 without plenty of luck. The best the GSKILL sticks on hand could manage was around 2500–2550 MHz.
At BCLK 106 or so, motherboard components stop working reliably, and past 108 you’ll be lucky to get beyond the BIOS screen without alterations to the boot setup. A bump to 104–105 will net a small but measurable bit of gaming performance in the form of increased bandwidth to the iGPU, but keep in mind the CPU multiplier may need to be reduced to keep core clockspeeds in check.
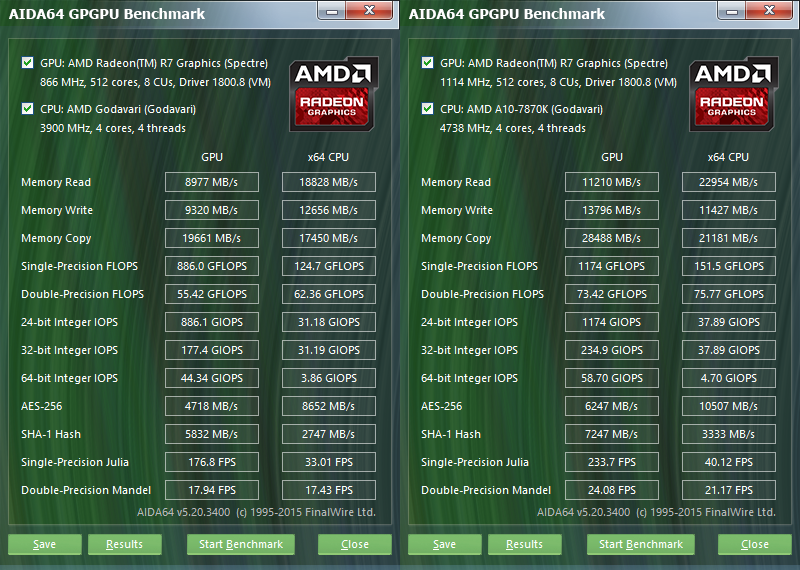
AM3+ motherboards sport a default BCLK value of 200 and have more options regarding front side bus (FSB) tuning if you’re willing to give up a few features for speed. Many AMD FX processors will happily run with extreme BCLK settings of 240 or more if you put the storage controller into the slower IDE mode rather than AHCI, although this gives up the speed, features and flexibility of the newer storage protocol.
Before SSDs were common, this tradeoff made plenty of sense, but these days the extra performance gained from SSDs and retaining AHCI’s TRIM support are more valuable than any gains provided by extreme BCLK tuning. Only try if you’re still running on a mechanical hard disk, although I’d recommend upgrading to an SSD and keeping AHCI instead.
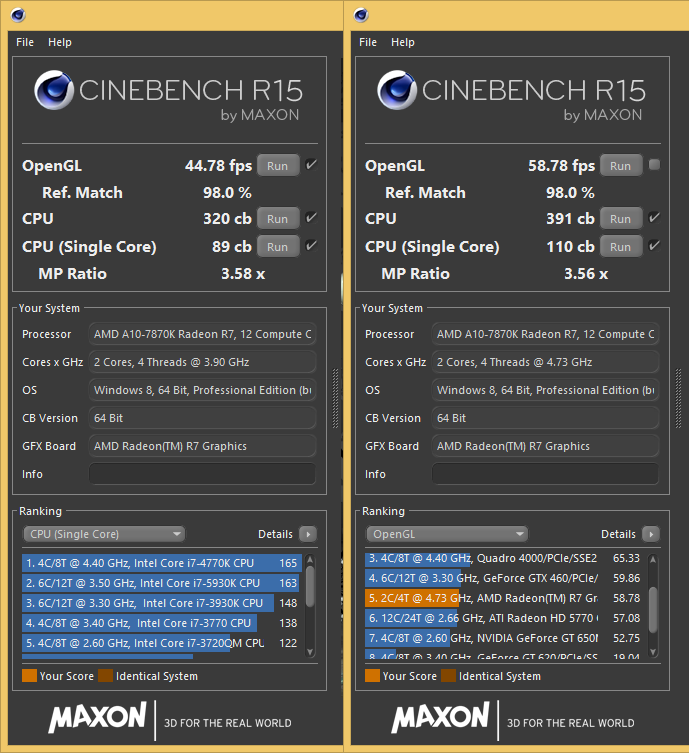
Cinebench results, overclocked on the right. OpenGL results jump 15 FPS.
If you don’t want to play with BCLK adjustments, or you feel like going beyond them, you can tighten DRAM timing to improve latency. This has less effect than increasing bandwidth, but helps with CPU core performance and raises minimum framerates. Increasing Northbridge and HyperTransport (AM3+ only) speeds to 2000–2400 can also result in modest gains, but these increases often come at the expense of other clocks so tread with care. AM3+ system tend to gain more ground than FM2+ here.
As a rule of thumb, adjust Northbridge and HyperTransport to improve an overclock on AM3+, and adjust Northbridge to stabilize one on FM2+. Linking these clocks together along with DRAM speed can also improve stability, although results vary. On our test system the best results with Godavari were gained by leaving this setting on Auto.
Last but not least, check to see if you can regain that multiplier set aside for headroom at the beginning of the process. Don’t push too hard for this one, as it’s more a check to make sure no performance is left on the table. These BCLK adjustments, tighter timings and the other small improvements can give an otherwise fully tuned system a noticeable edge.
After establishing and saving the full overclock profile, consider easing settings back from the edge on daily-use hardware to provide a safety margin and save electricity. Leave turbo off, but try enabling sleep and low power modes to see if they cause problems. Both of these are worth having around if they don’t interfere with stability, since they lower temperatures and power usage.
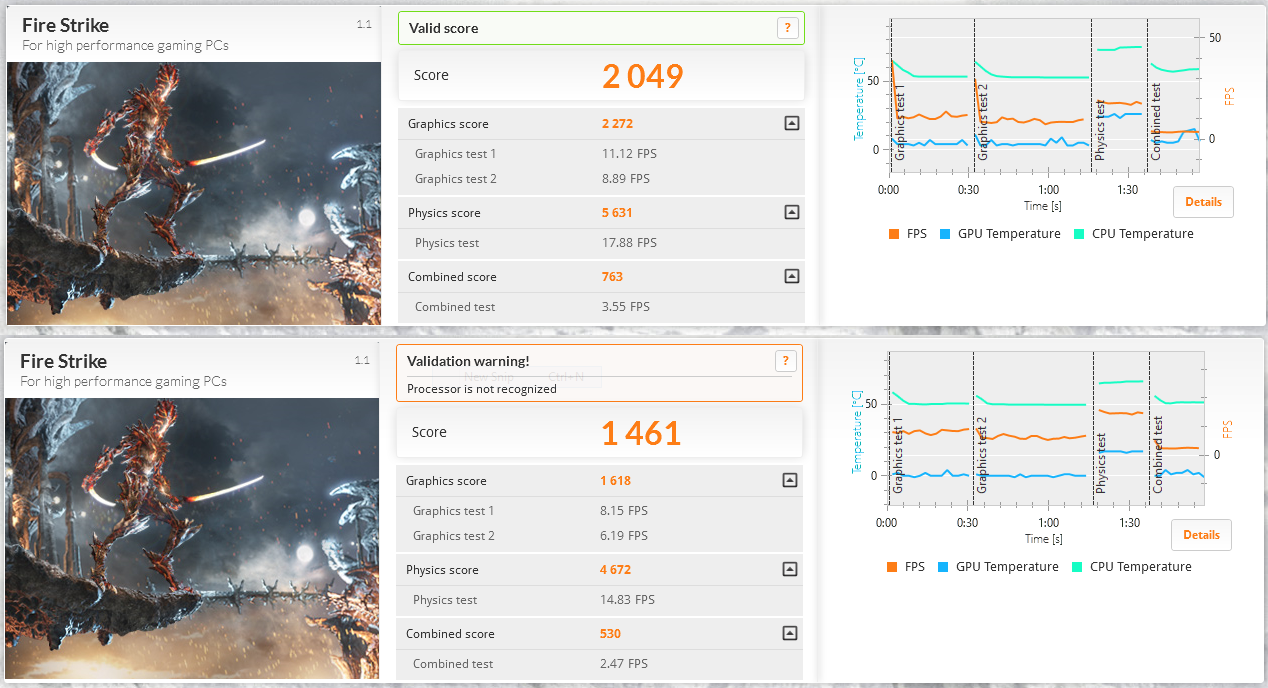
Results are predictably impressive, given the sizable clock boosts involved. CPU speeds nearing 5 GHz improve benchmarks by a third or more and help alleviate AMD’s single-core performance deficits. On the GPU side framerates jump even further, giving most games enough muscle for increased detail settings or resolution to go along with the FPS boost.
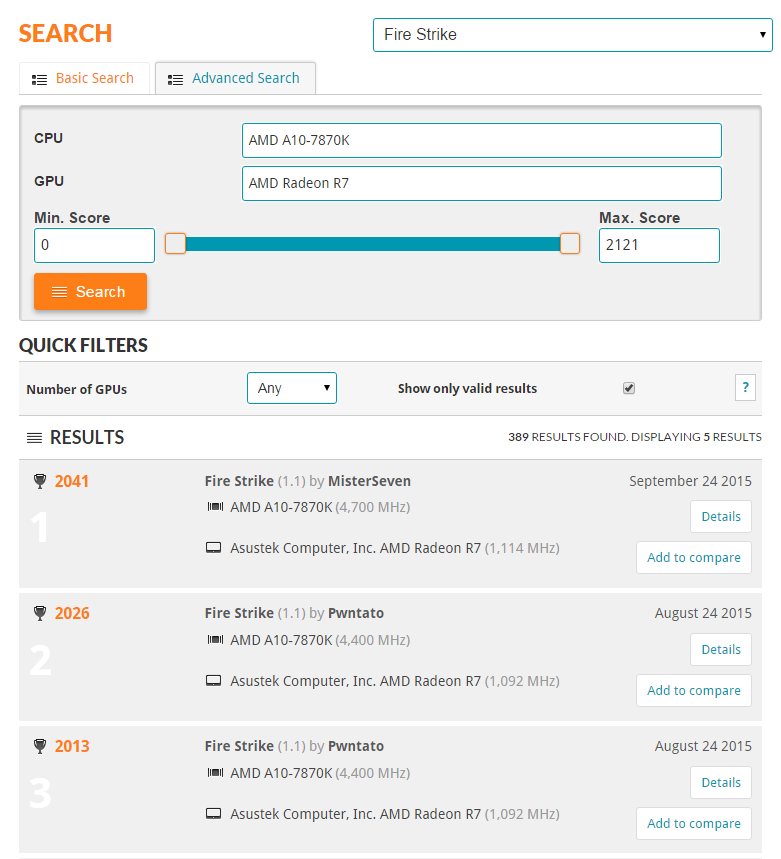
The proof is in the pudding. The test system for this guide started with a decidedly milquetoast 1461 Firestrike score using default motherboard settings. After overclocking, this same system literally shot to the top of the charts, scoring over 2000 points and capturing the number one slot on 3DMark for this CPU/motherboard combination.
That performance jump is more than double what you could expect from a typical upgrade so if there’s anyone left asking whether overclocking is worth it, the verdict is in and the answer is a resounding yes.
