How to Build a Computer Test Bench
3. Pushing Buttons
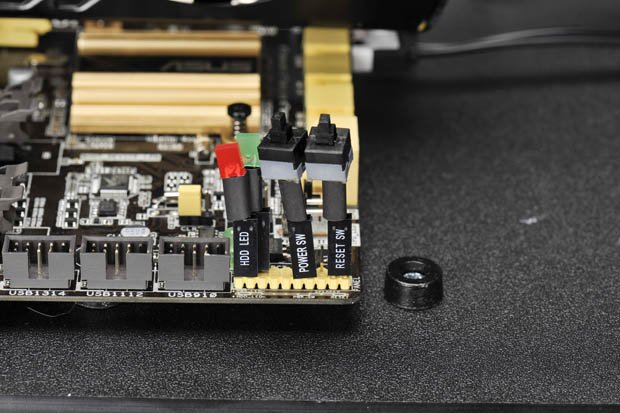
The buttons and lights on the front of an ATX case are very useful, and allow you to turn on your system, reboot it, and watch CPU and hard-drive activity. Open-air benches have similar buttons and lights—on this model it’s called the ATX control kit and features a set of buttons and LEDs that plug into the motherboard's front-panel connectors. It even comes with a PC speaker, so you can hear beep codes in order to help you diagnose hardware issues (unless your motherboard has a debug LED on it, making the speaker redundant). You could always short the power-on circuit yourself with a knife blade, but this is more… dignified.
4. Feeling Pinched
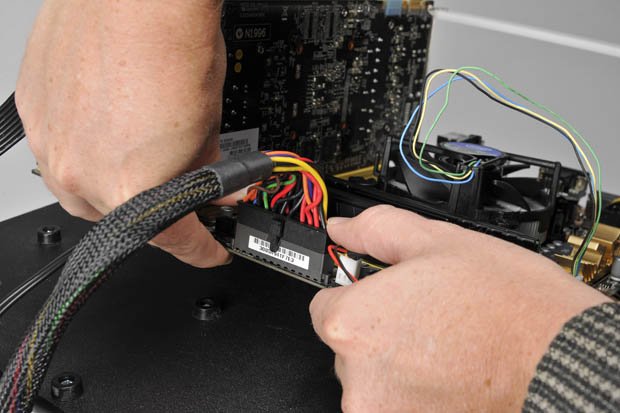
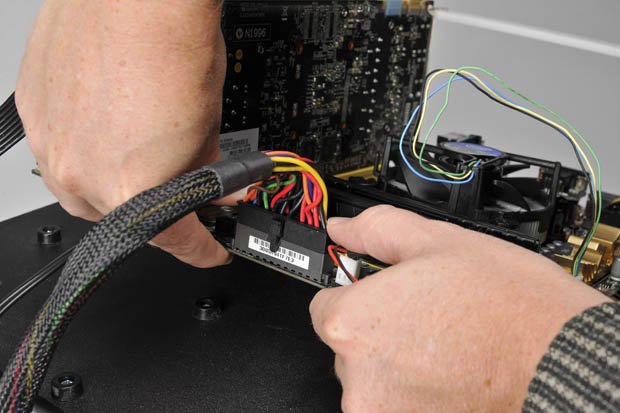
The top tray has an array of standoffs that accommodate ATX, eATX, Mini-ITX, and microATX motherboards. The standoffs sit inside rubberized feet secured with Phillips screws, so you can easily pop them out of one spot and stick them into another. No screws actually touch the motherboard, of course; it just sits on top of the rubber feet. Again, this is by design, to make it easier to swap one board for another. It does complicate plugging in power cables though, as pressing down on one edge of the board can raise the other side. When the connector is large, like with the 24-pin power cable, you have to pinch the top and bottom of the board at the same time, sandwiching the connector, as shown in the photo. When the connector is small, like a USB 2.0 cable, you can just support the board from below with your hand, right underneath where the connector is going in.
5. Getting Some Air
Thanks to the open design of this workbench, there are no limitations to the length of PCI cards (handy when Nvidia and AMD deliver the latest 12-inch monsters). Cards are slid into their expansion slots and secured to the support bracket with the included plastic screws. The support brace is supported by metal posts but is made of plastic to help prevent static discharge. There are a total of seven screw holes in the bracket, which should be more than enough for any mobo configuration.
Once a video card, hard drive, or RAID controller is installed, you may want to add additional cooling that would normally occur by virtue of a case’s airflow, but is lacking in this setup. Your best bet is to just place a 120mm fan on the top tray to move air across the components — jerry-rigged, maybe, but effective. Since the fans are easily accessible, we like being able to control fan speeds with a fan mate, which is an inline fan speed controller. HighSpeed PC also sells extension kits for mounting additional fans on the rim of the upper tray, but we’ve never felt the need to add that much cooling.
6. Dat Masscool
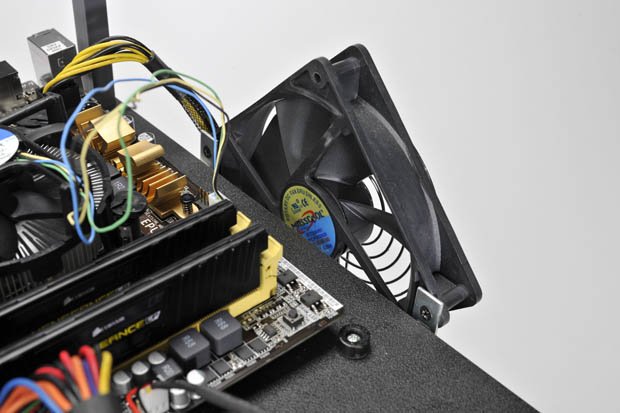
The workbench comes with a pre-installed 120mm Masscool fan with a grill that is mounted in between the bench’s two tiers, so it blows air over the top and bottom of the tray, hitting the motherboard and any storage devices sitting in the rails below. The fan is universally compatible too, sporting both a 3-pin and a 4-pin Molex cable, so it’ll work with any setup you have. That single fan should provide more than sufficient cooling for a basic workbench. It’s surprisingly quiet, but we also use the onboard fan control in our system BIOS to make sure it’s silent.
The ATX control kit is not bad, either. Each of the widgets has an embossed triangle indicating the positive wire, so connecting them is simple. It won't damage anything if you install them incorrectly; they simply won't work. Things got a bit tight on our test board when we tried to plug in the semi-stiff PC speaker widget, so we left it off. The workbench also includes an expansion bracket with both power and reset buttons, but it’s really cheap and its wires are a rat’s nest.
Final Thoughts
It probably takes longer to assemble the workbench than it does to install all of its hardware, but once you remove a conventional case from the equation, building goes 10 times faster. You have superior lighting and there is minimal cable management to work out. We also love not having to worry about feeling crowded or lacking in space when building these rigs. There are some downsides, though. This workbench doesn't really allow liquid cooling, as there’s nowhere to mount the radiator. It would also be nice to have a couple of fasteners to pin down the motherboard, and we’d love to have an SSD rail included instead of it being an expensive add-on. Also, $140 is a lot of money, but HSPC also sells a smaller ATX bench for $80 that will be fine for most users.
The biggest gaming news, reviews and hardware deals
Keep up to date with the most important stories and the best deals, as picked by the PC Gamer team.
Probably the biggest problem with these setups is the exposed fan blades on the CPU, GPU, and chassis. We can already see a small child or a pet getting in trouble around this thing, so be sure to take precautions before deploying one in your home.

Dave has been gaming since the days of Zaxxon and Lady Bug on the Colecovision, and code books for the Commodore Vic 20 (Death Race 2000!). He built his first gaming PC at the tender age of 16, and finally finished bug-fixing the Cyrix-based system around a year later. When he dropped it out of the window. He first started writing for Official PlayStation Magazine and Xbox World many decades ago, then moved onto PC Format full-time, then PC Gamer, TechRadar, and T3 among others. Now he's back, writing about the nightmarish graphics card market, CPUs with more cores than sense, gaming laptops hotter than the sun, and SSDs more capacious than a Cybertruck.
