How to get the Cold War Outbreak Easter egg
Everything you need to do in the Cold War Outbreak Main Quest.

Looking for the CoD Cold War Outbreak Easter egg? Outbreak just received its first Main Quest, and it features several steps that eventually lead to a ferocious boss fight. Dedicated players have already braved Legion and have even managed to beat it, but if you're struggling to work out what to do I'm here to help.
In keeping with previous Easter eggs on Firebase Z and Die Maschine, you'll be fighting to survive against waves of zombies while completing intricate missions to reach the end of this Main Quest. What makes the latest challenge even trickier is that it can spread across all the Outbreak maps. Here's how to solve the Outbreak Easter egg.
Preparation
All Cold War Outbreak Easter egg steps: How to complete the Main Quest
You can start this Easter egg as early as round three, and you'll be able to finish it by round five. However, that doesn't mean it's easy. The enemies in this mode move in thick and fast, and you can die at any moment. I recommend teaming up with your pals and taking on this quest together as it feels near impossible solo.
To give your squad a fighting chance, spend the opening rounds preparing for the long challenge ahead by opening chests, upgrading your weapons, and completing side missions. While carrying a shotgun is usually a good idea in Call of Duty's Zombie modes, make sure you've got a powerful ranged weapon for the boss fight later on. Even though it feels very early, try to buff your loadout as much as possible in rounds one and two. If you can get your hands on a Wonder Weapon, that's even better.
Round Three

How to find the Amplifiers in Outbreak
Listen to the radio and tune the signal amplifiers
To begin the Easter egg, you need to find the radio. Unfortunately, the radio location isn't marked on your map, so you'll need to hunt around for it. Alternatively, you can watch MrDalekJD's detailed walkthrough video, which shows the radio and amplifier locations on every Outbreak map, as well as other helpful locations throughout the Main Quest.
Once you've located the radio, press F to listen to the 'unknown signal' and a few zombies will appear around it. Eliminate the zombies, then walk back over to the radio. It's now emitting a static noise. There are three amplifiers nearby that you'll now need to tune to the same frequency. Keep an eye out for more zombies, and head to each one to tune them to match the radio static.
The biggest gaming news, reviews and hardware deals
Keep up to date with the most important stories and the best deals, as picked by the PC Gamer team.
After all three amplifiers are tuned, walk back to the radio and interact with it. If you've done your job correctly it'll drop a Beacon Listening Device and some Zombie Essence.
Activate the Beacon
Head to the Beacon, which looks like a big metal tube with a telephone icon on its screen. Access the terminal and select the icon with the phone on it. After listening to the dialogue, the Beacon will display a white 'M' on the screen. You can now travel to the next map and round skip to begin round four.
Round Four
How to find the Outbreak monkey locations
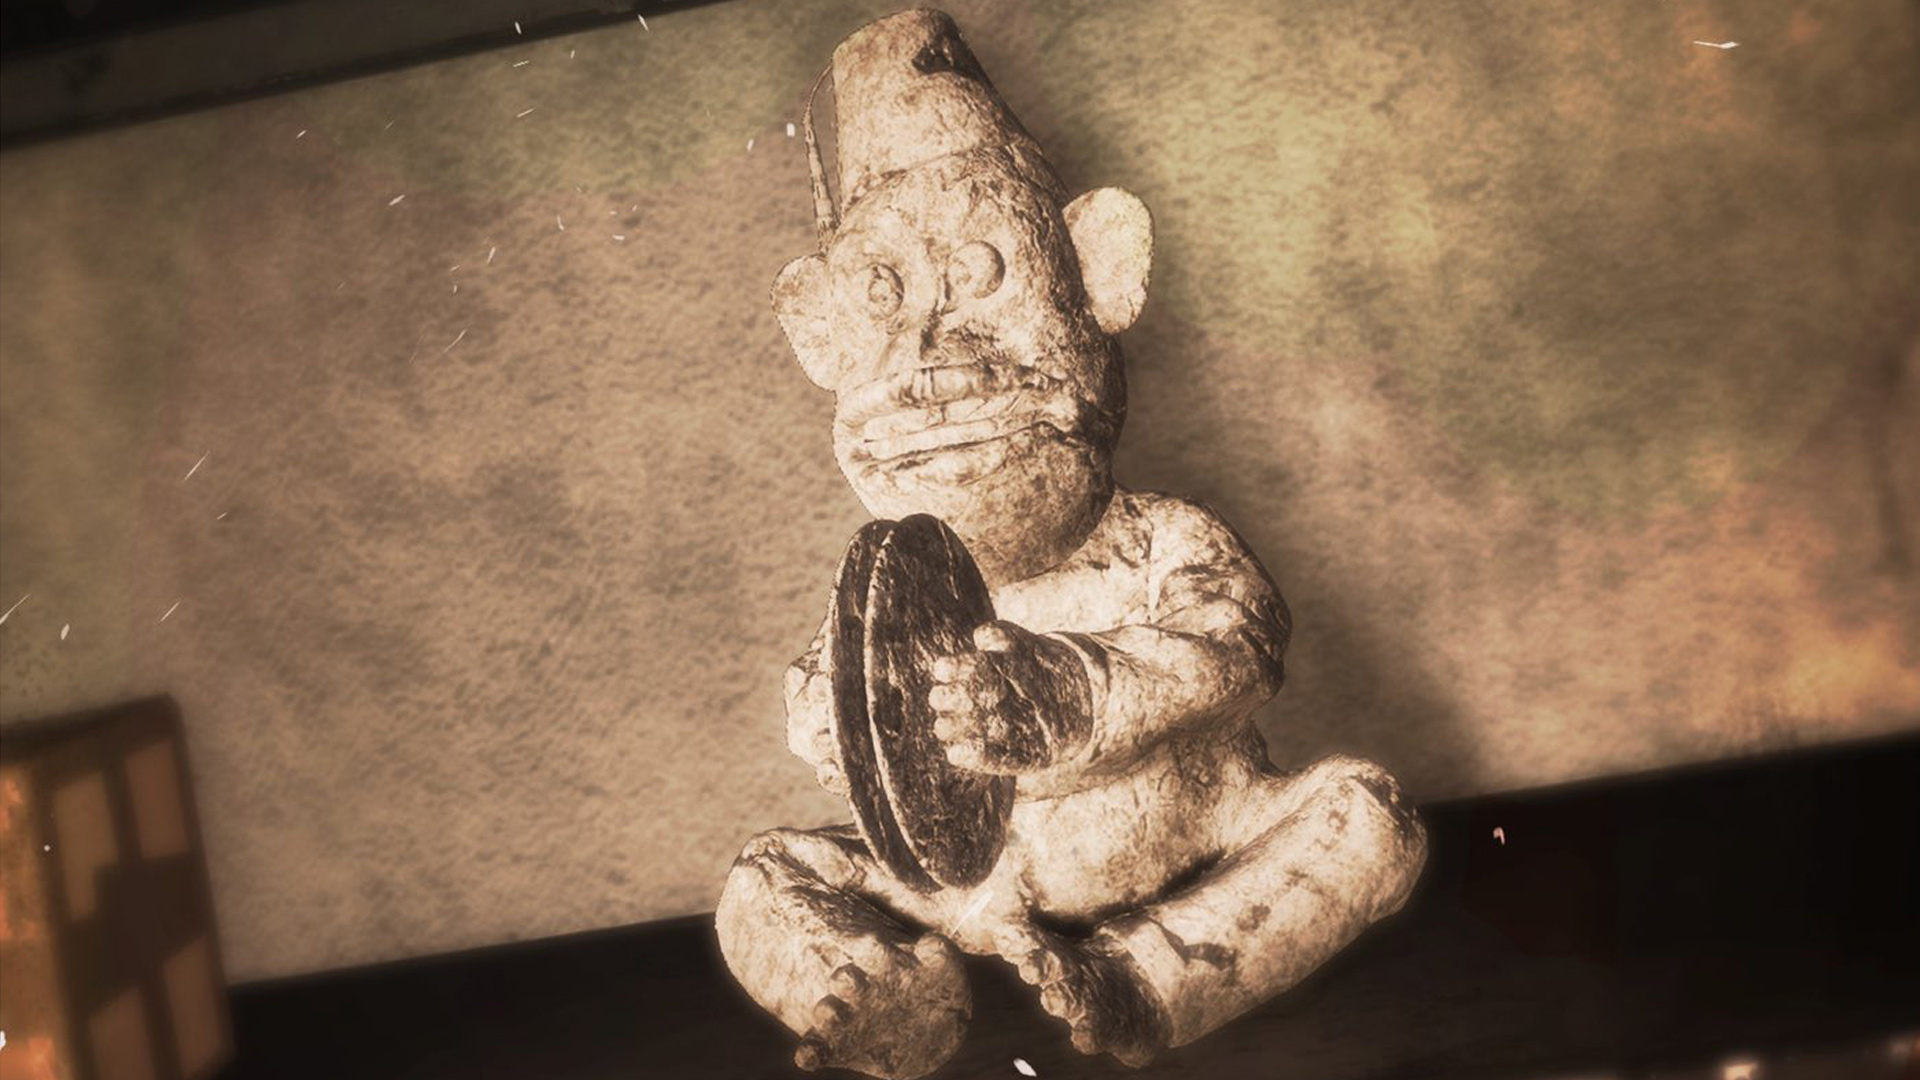
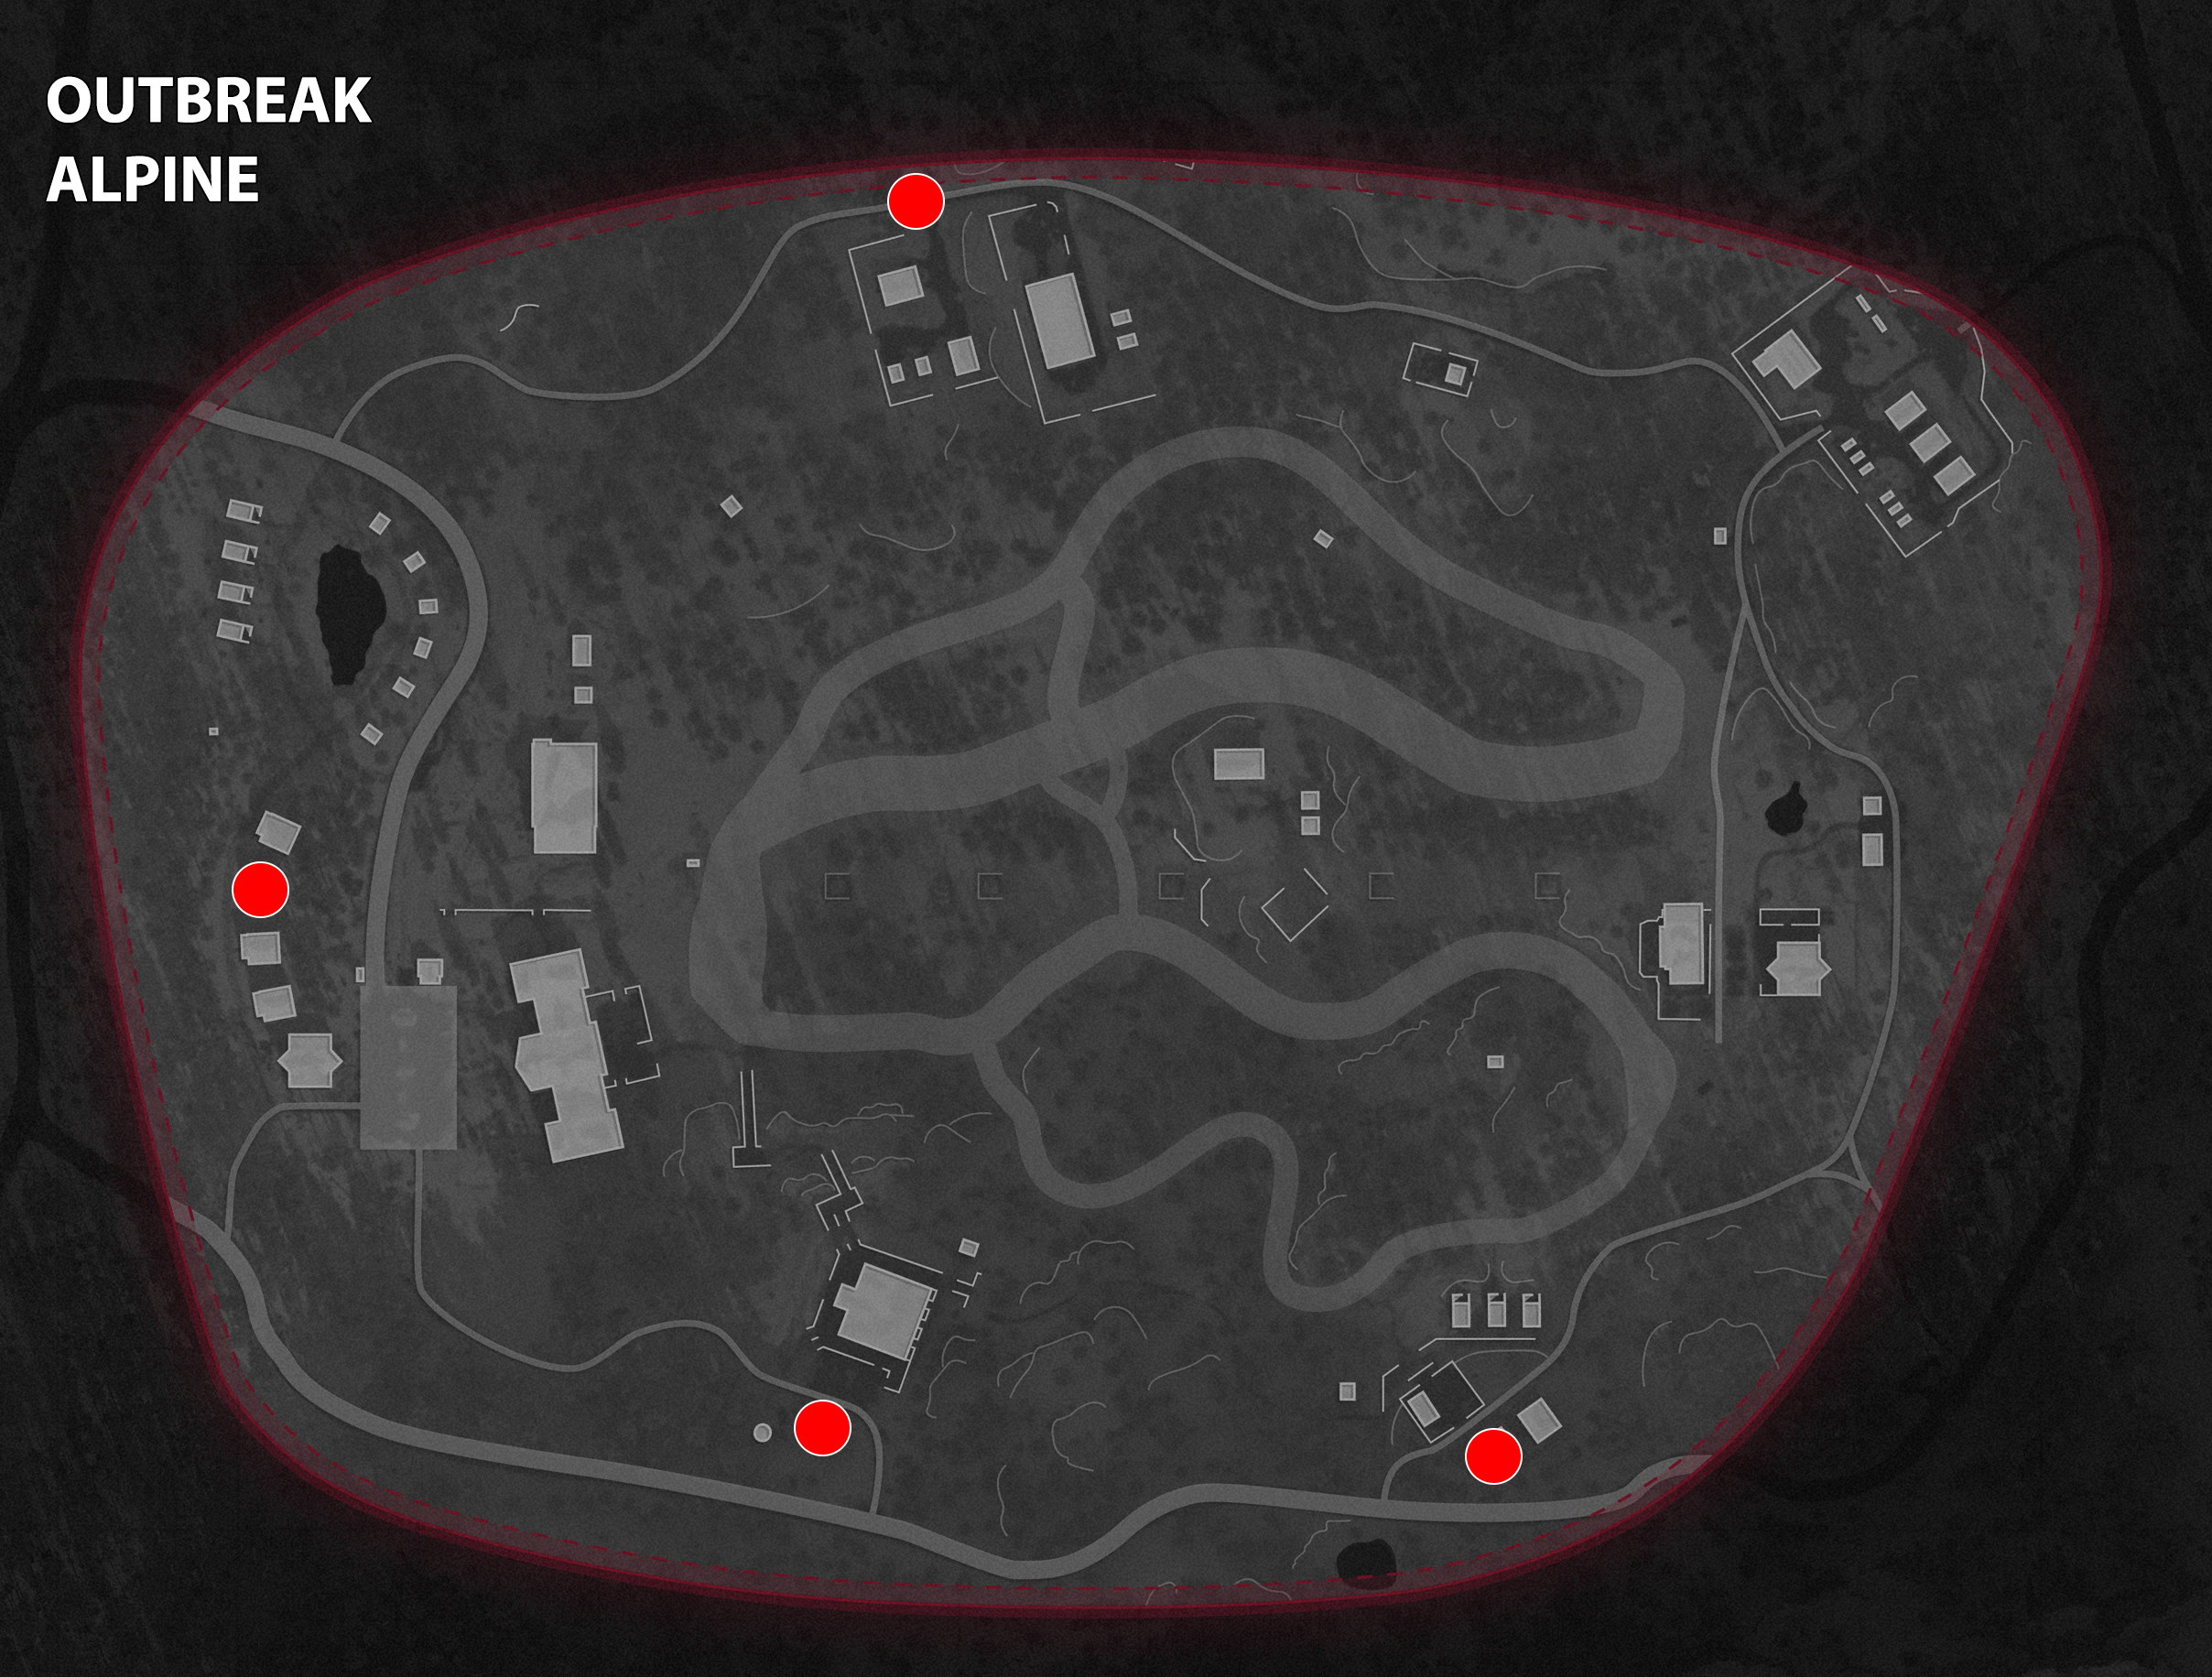
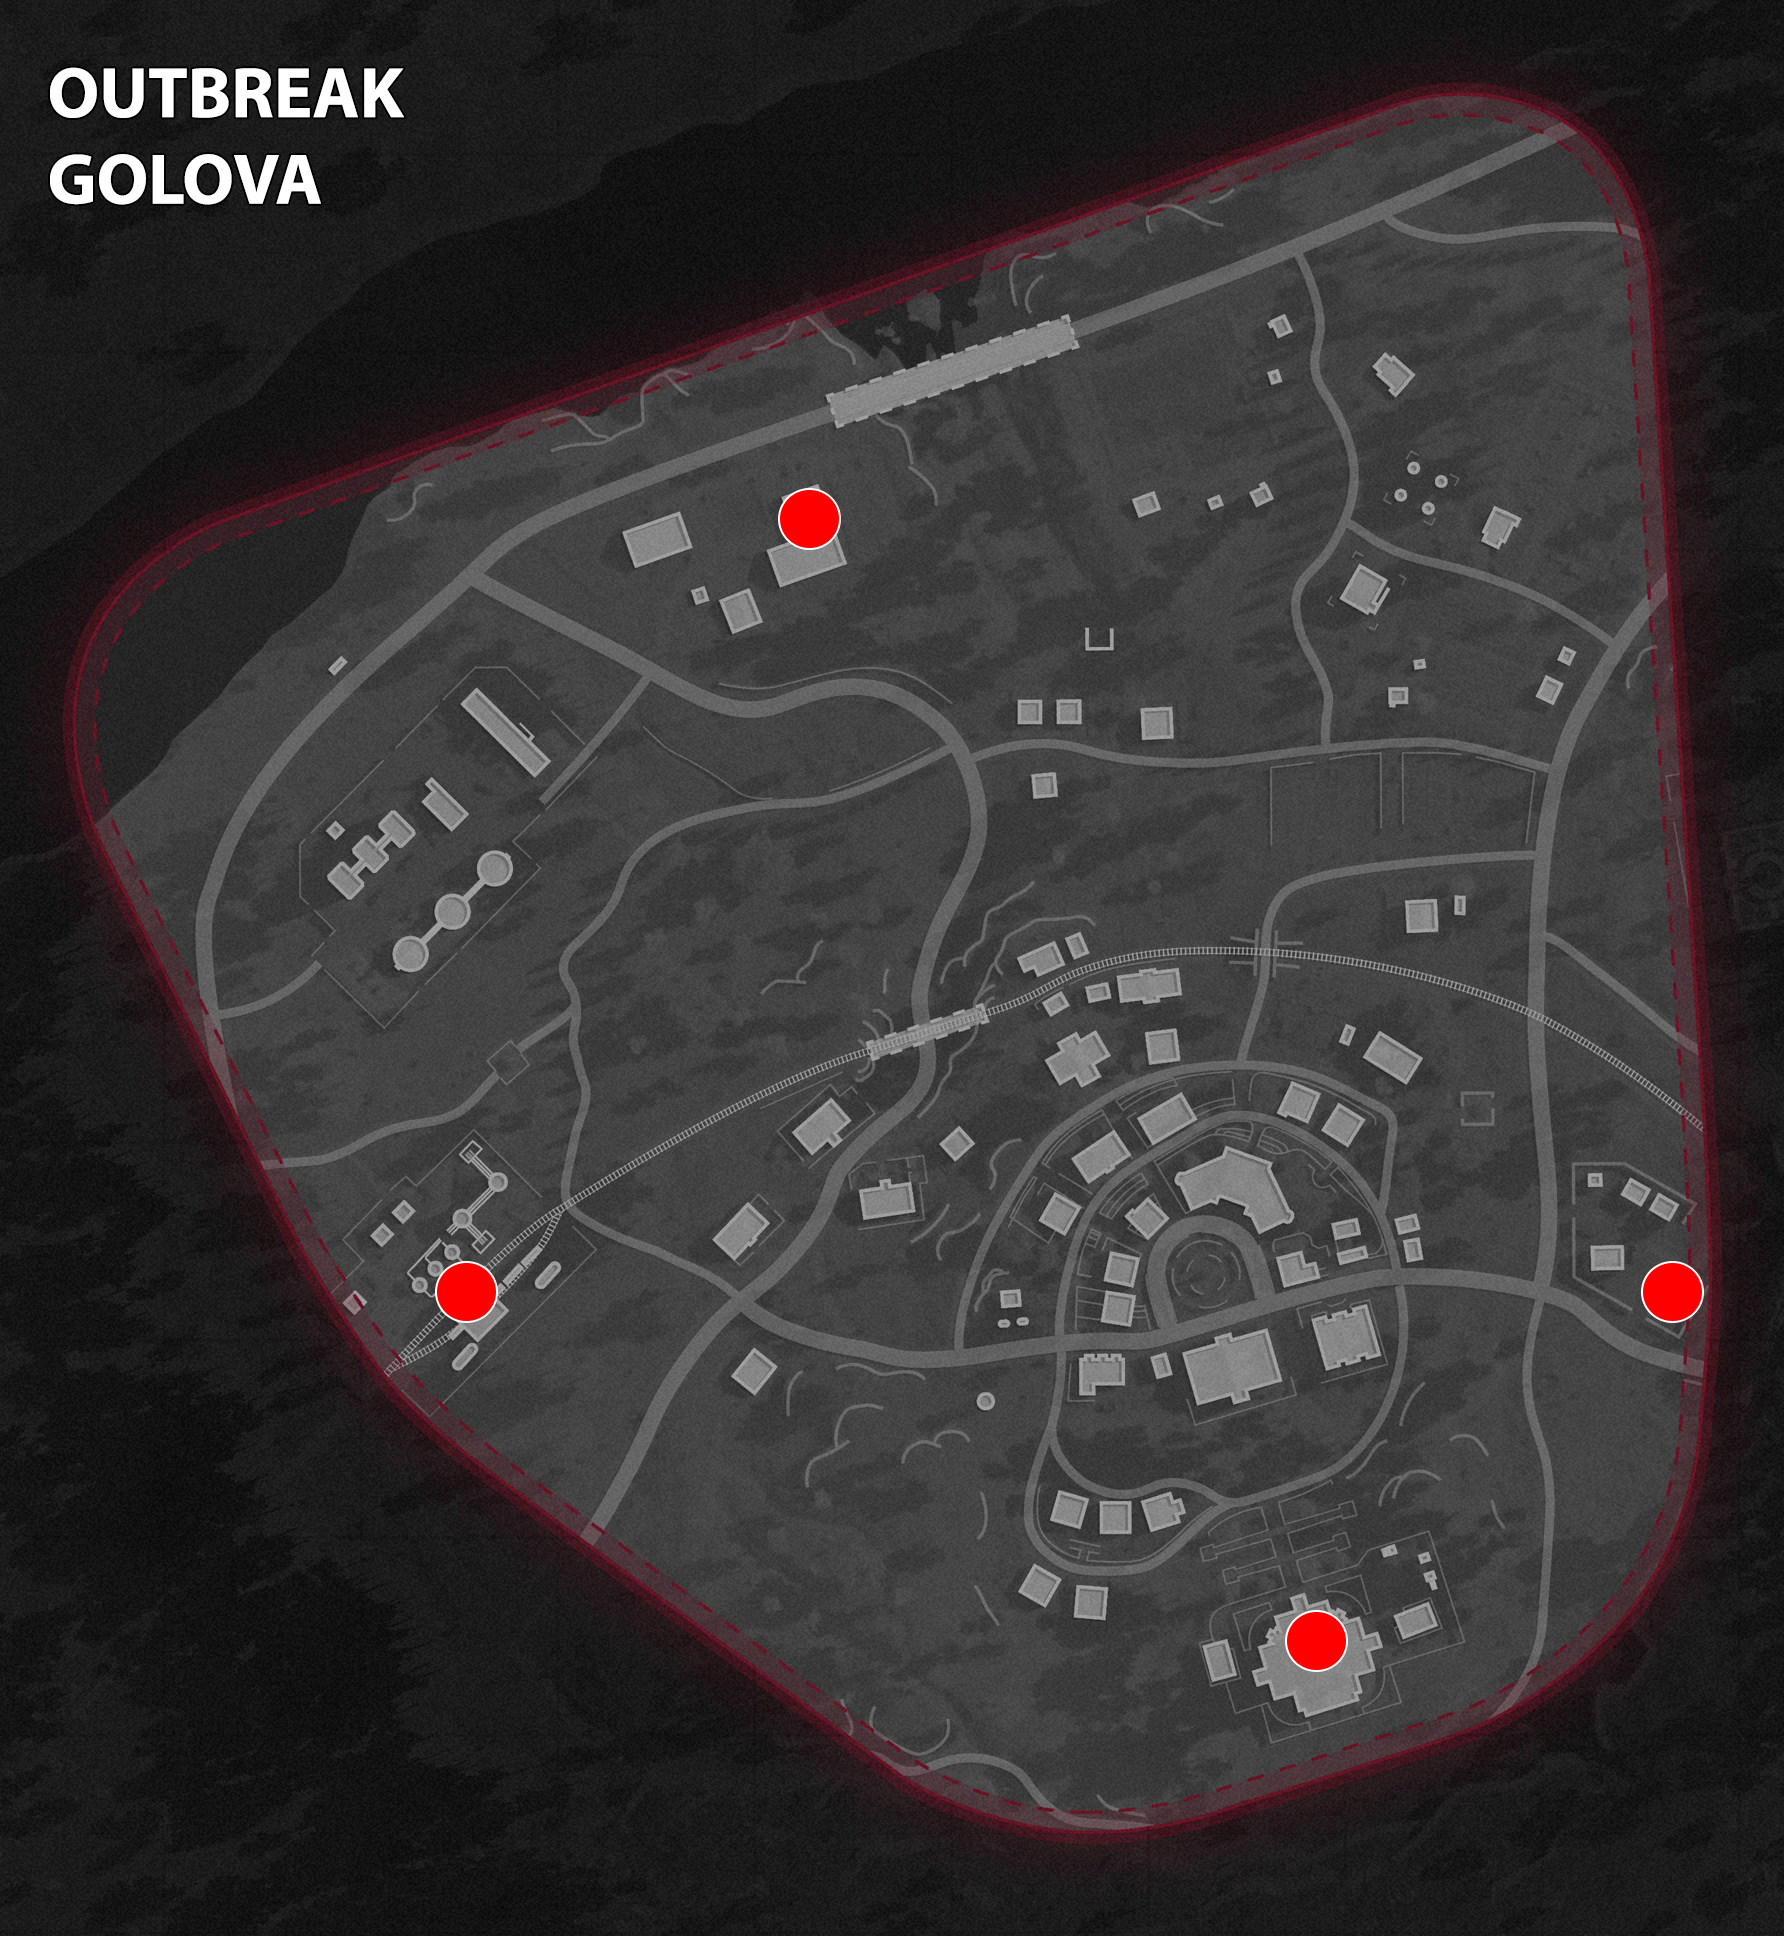
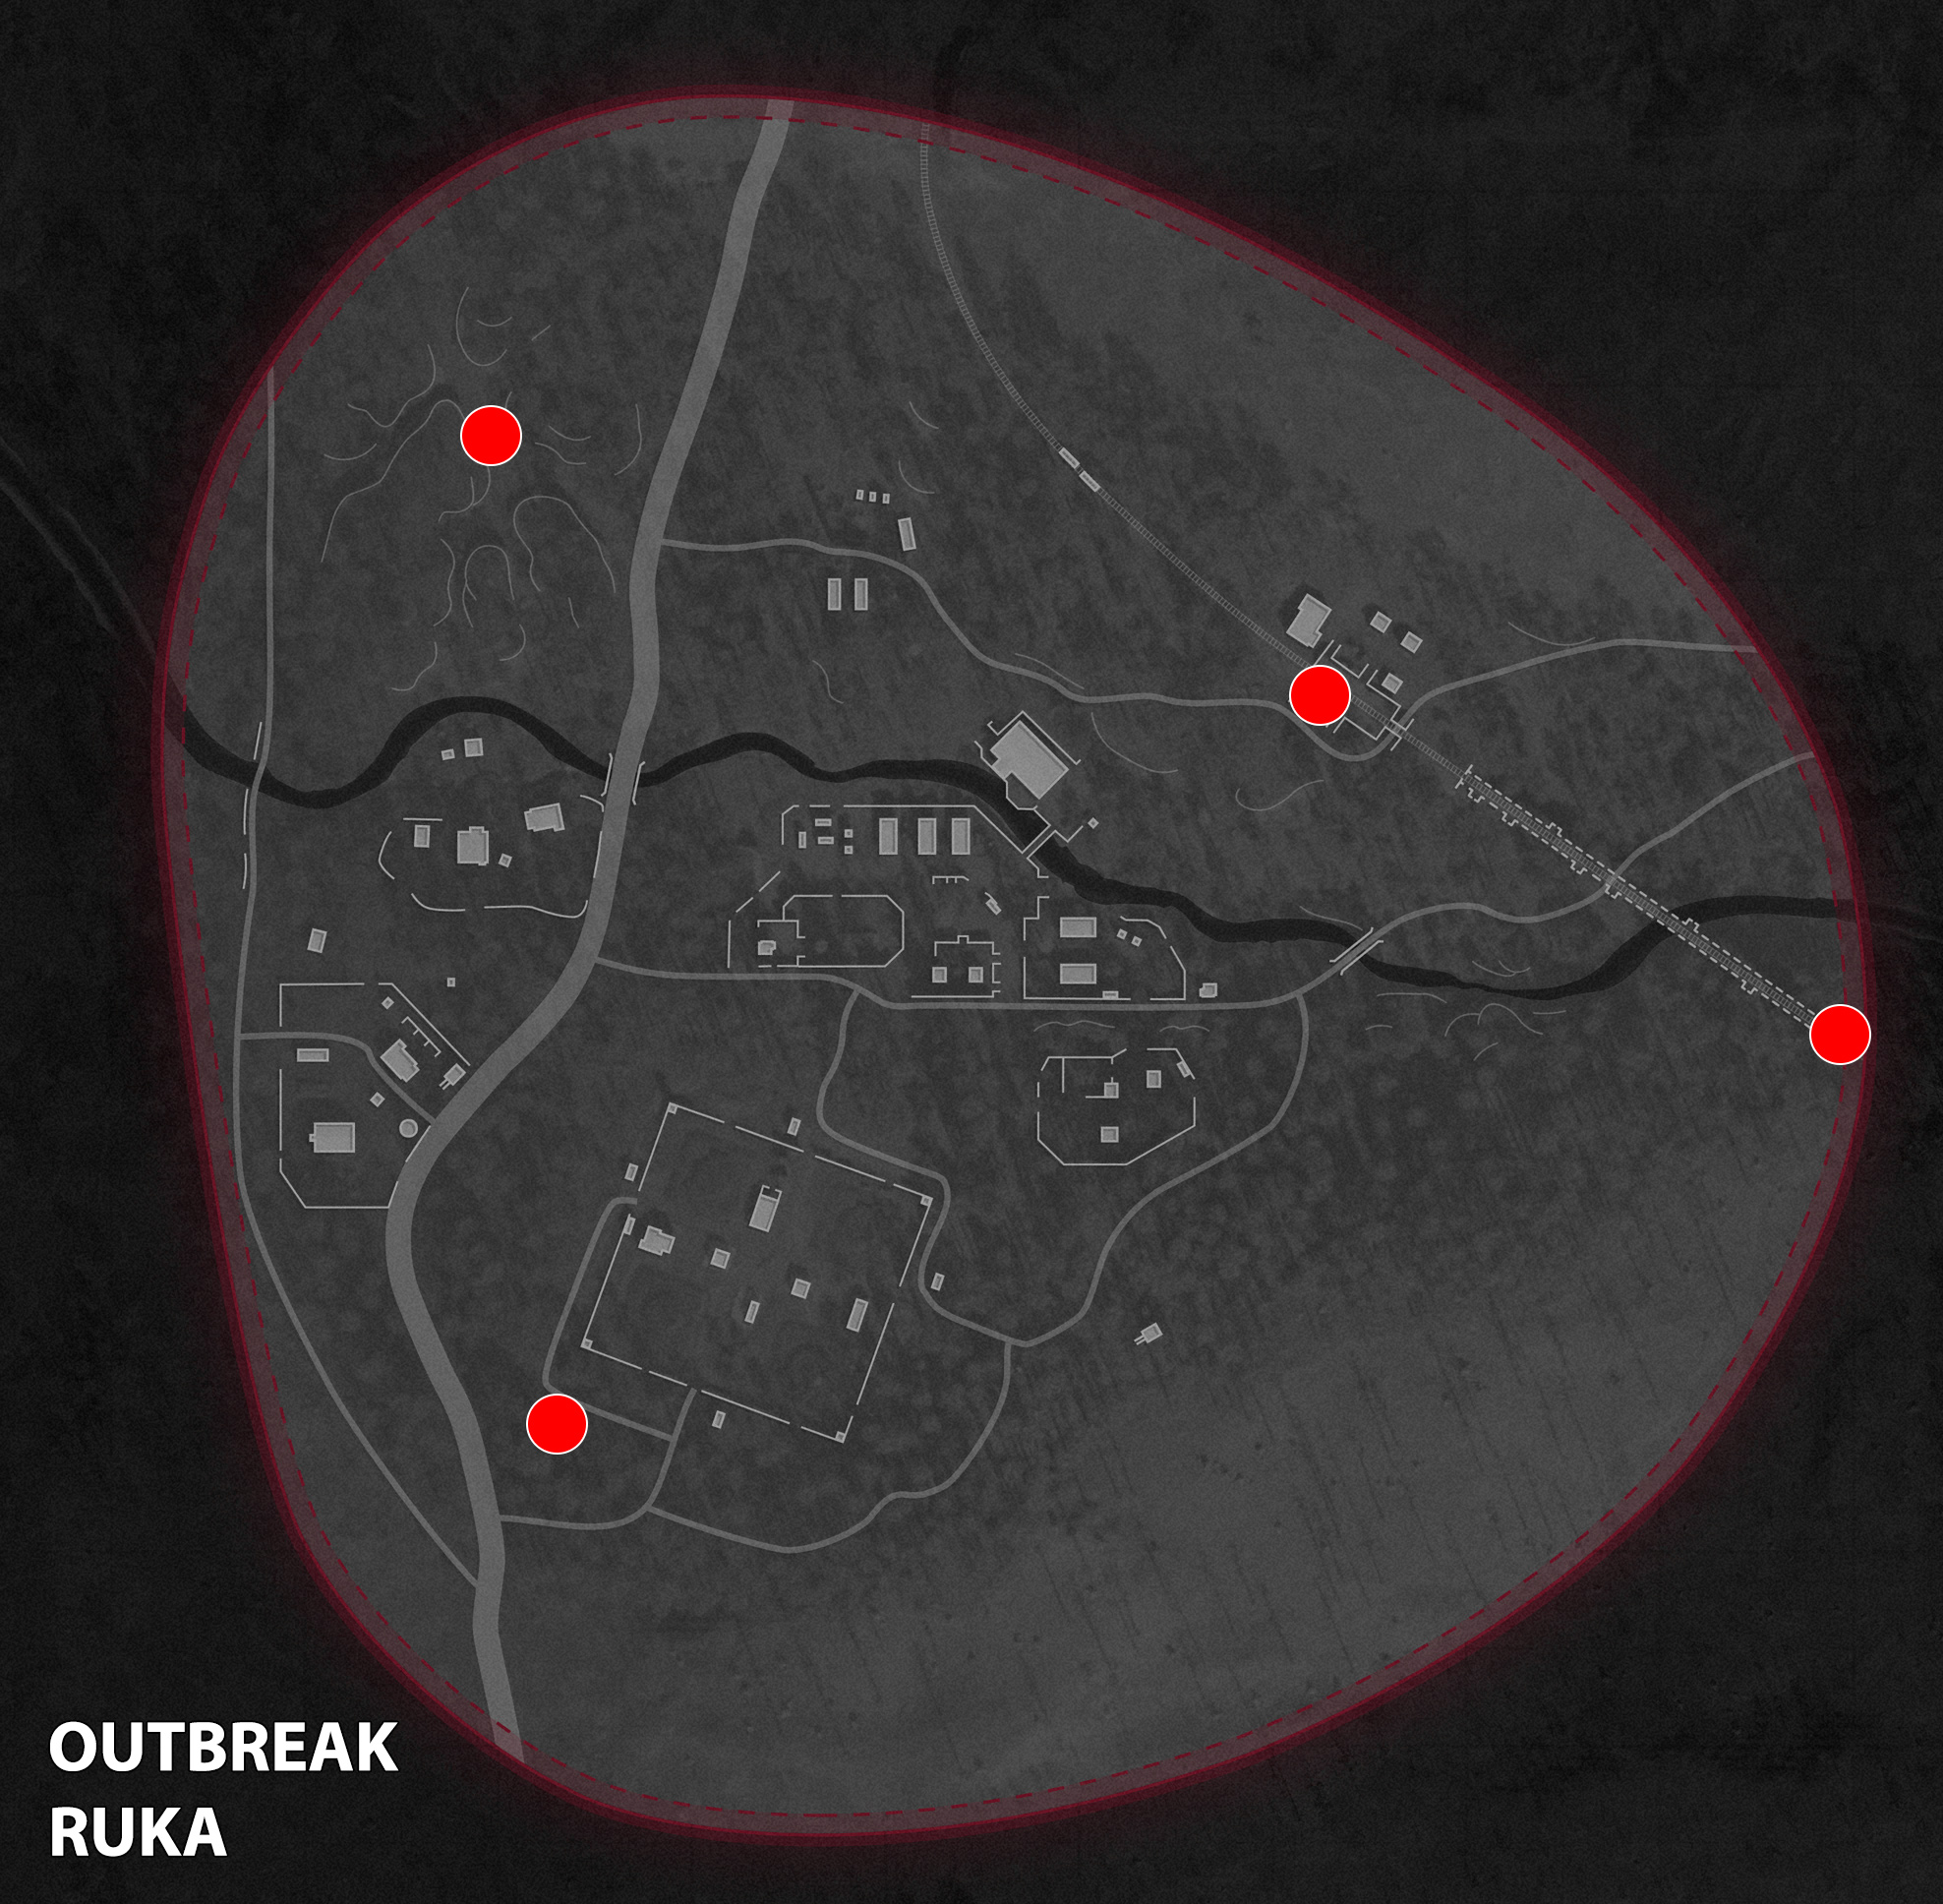
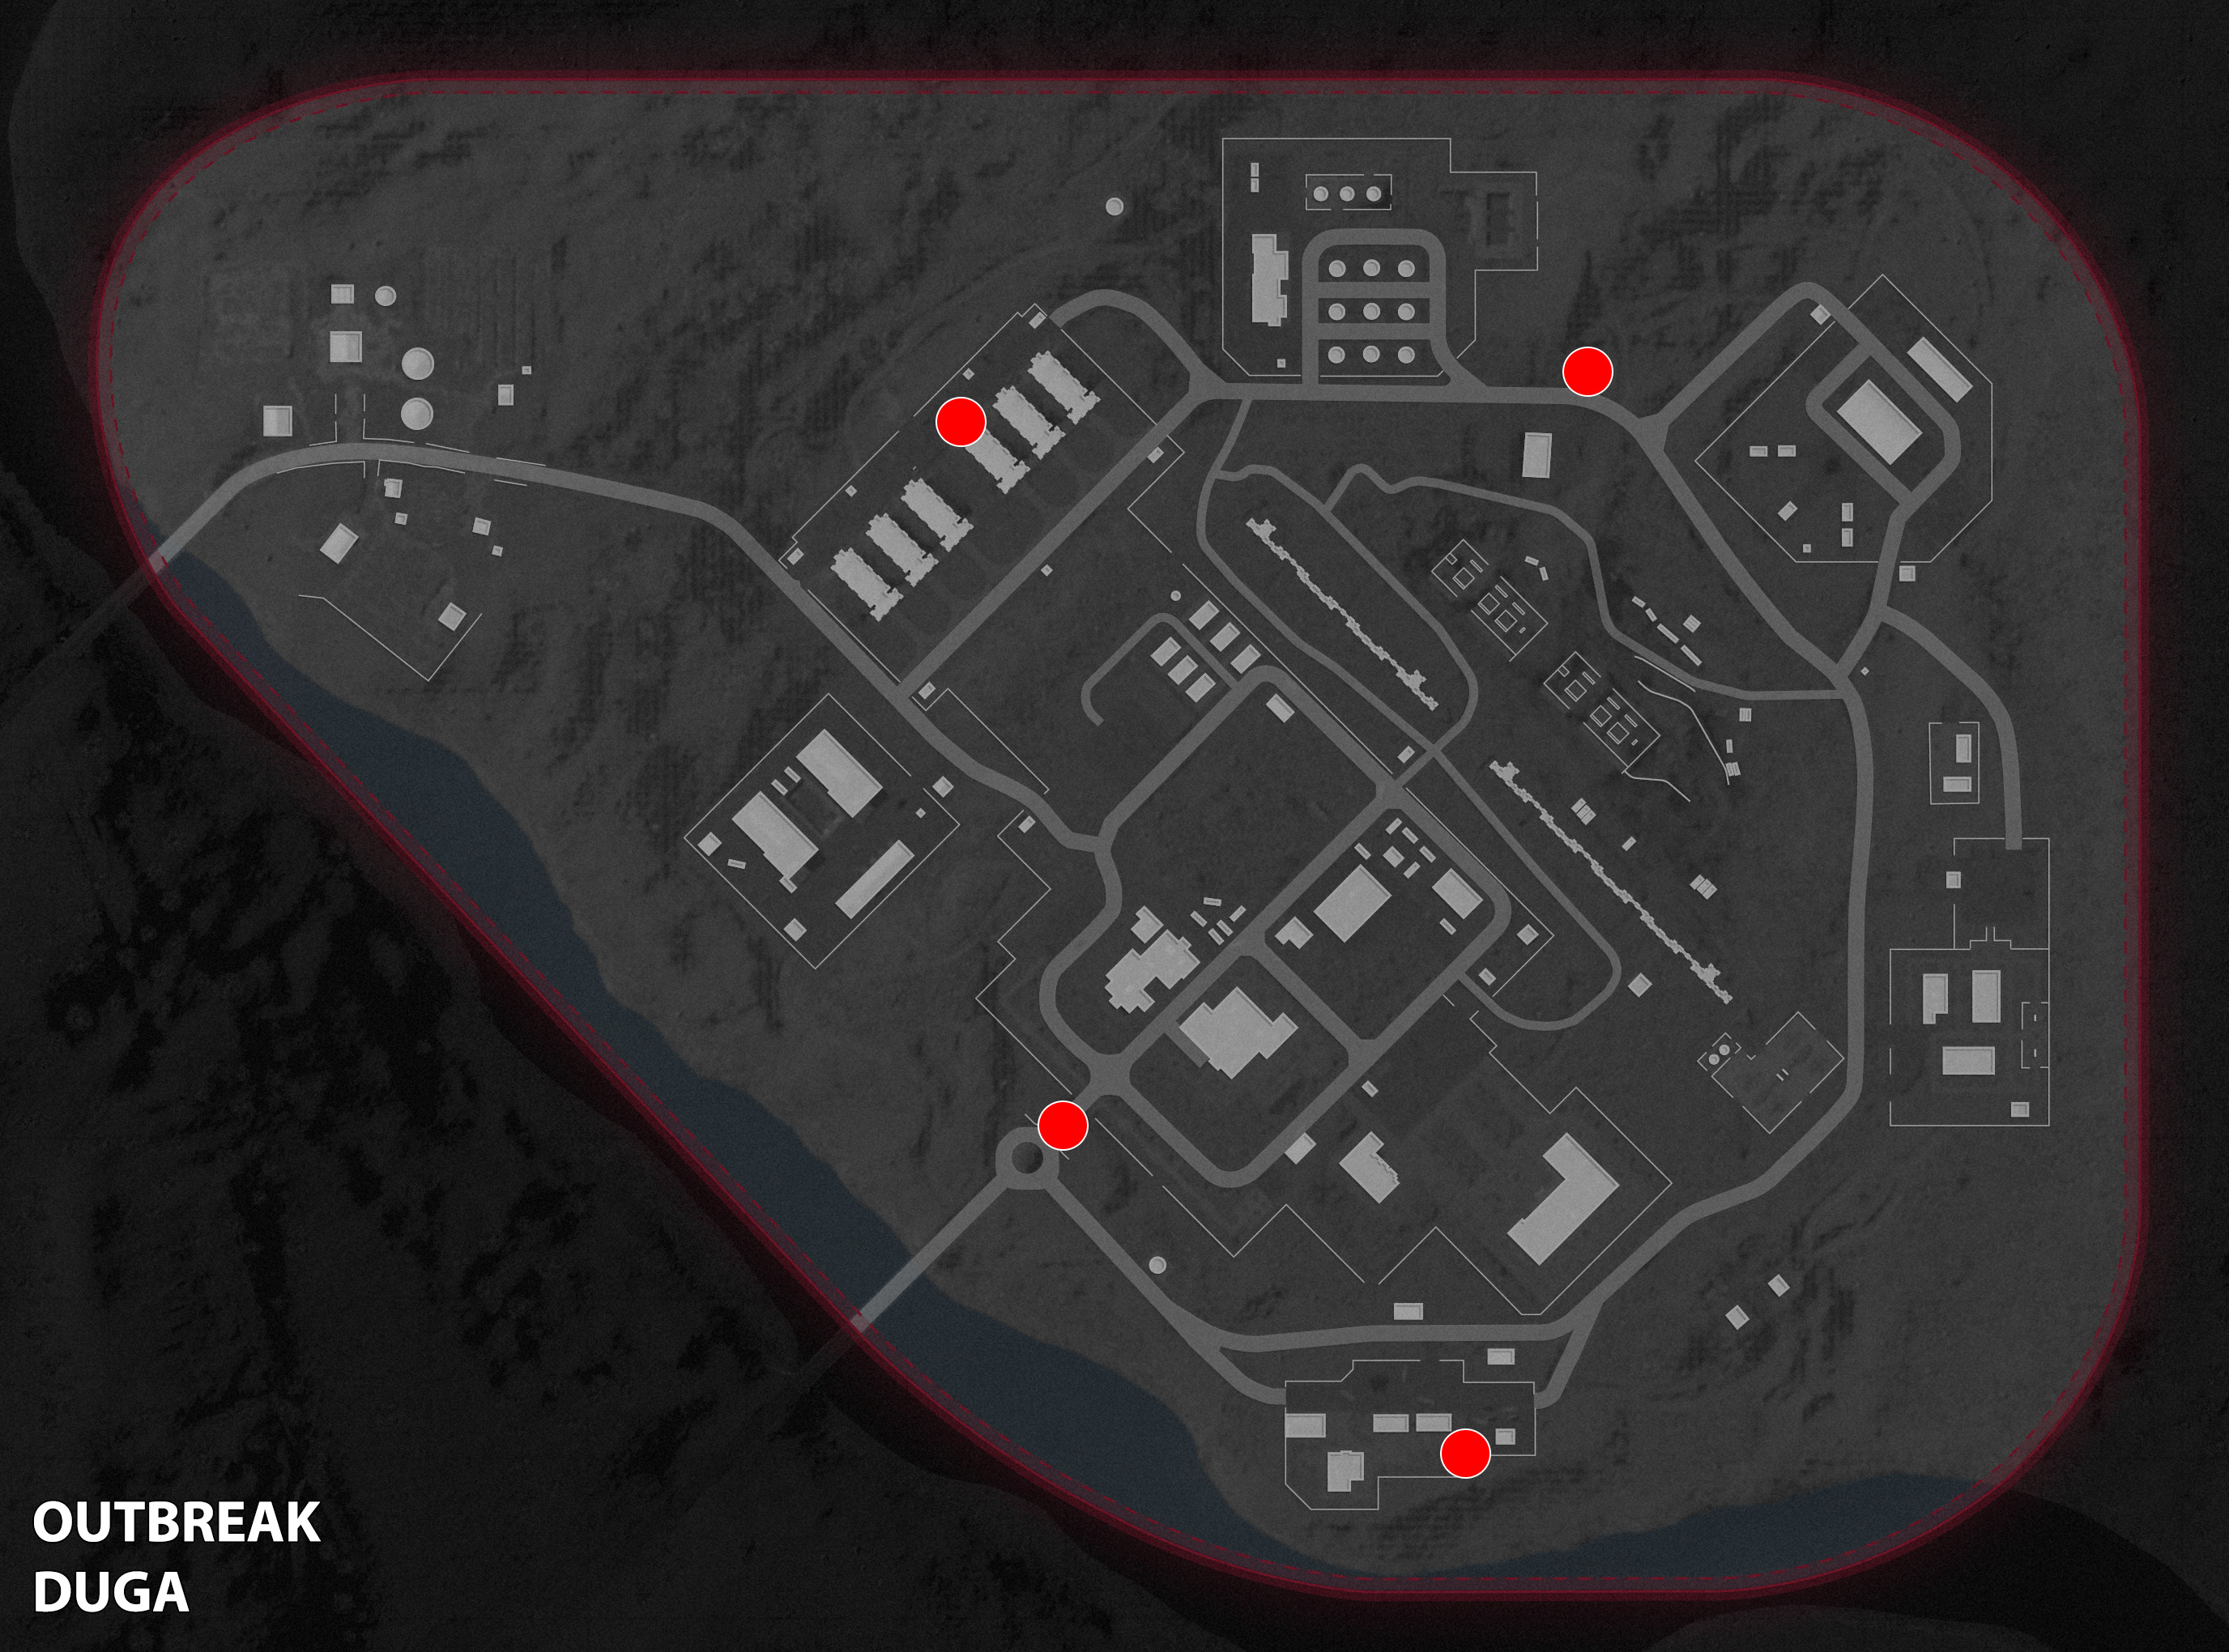
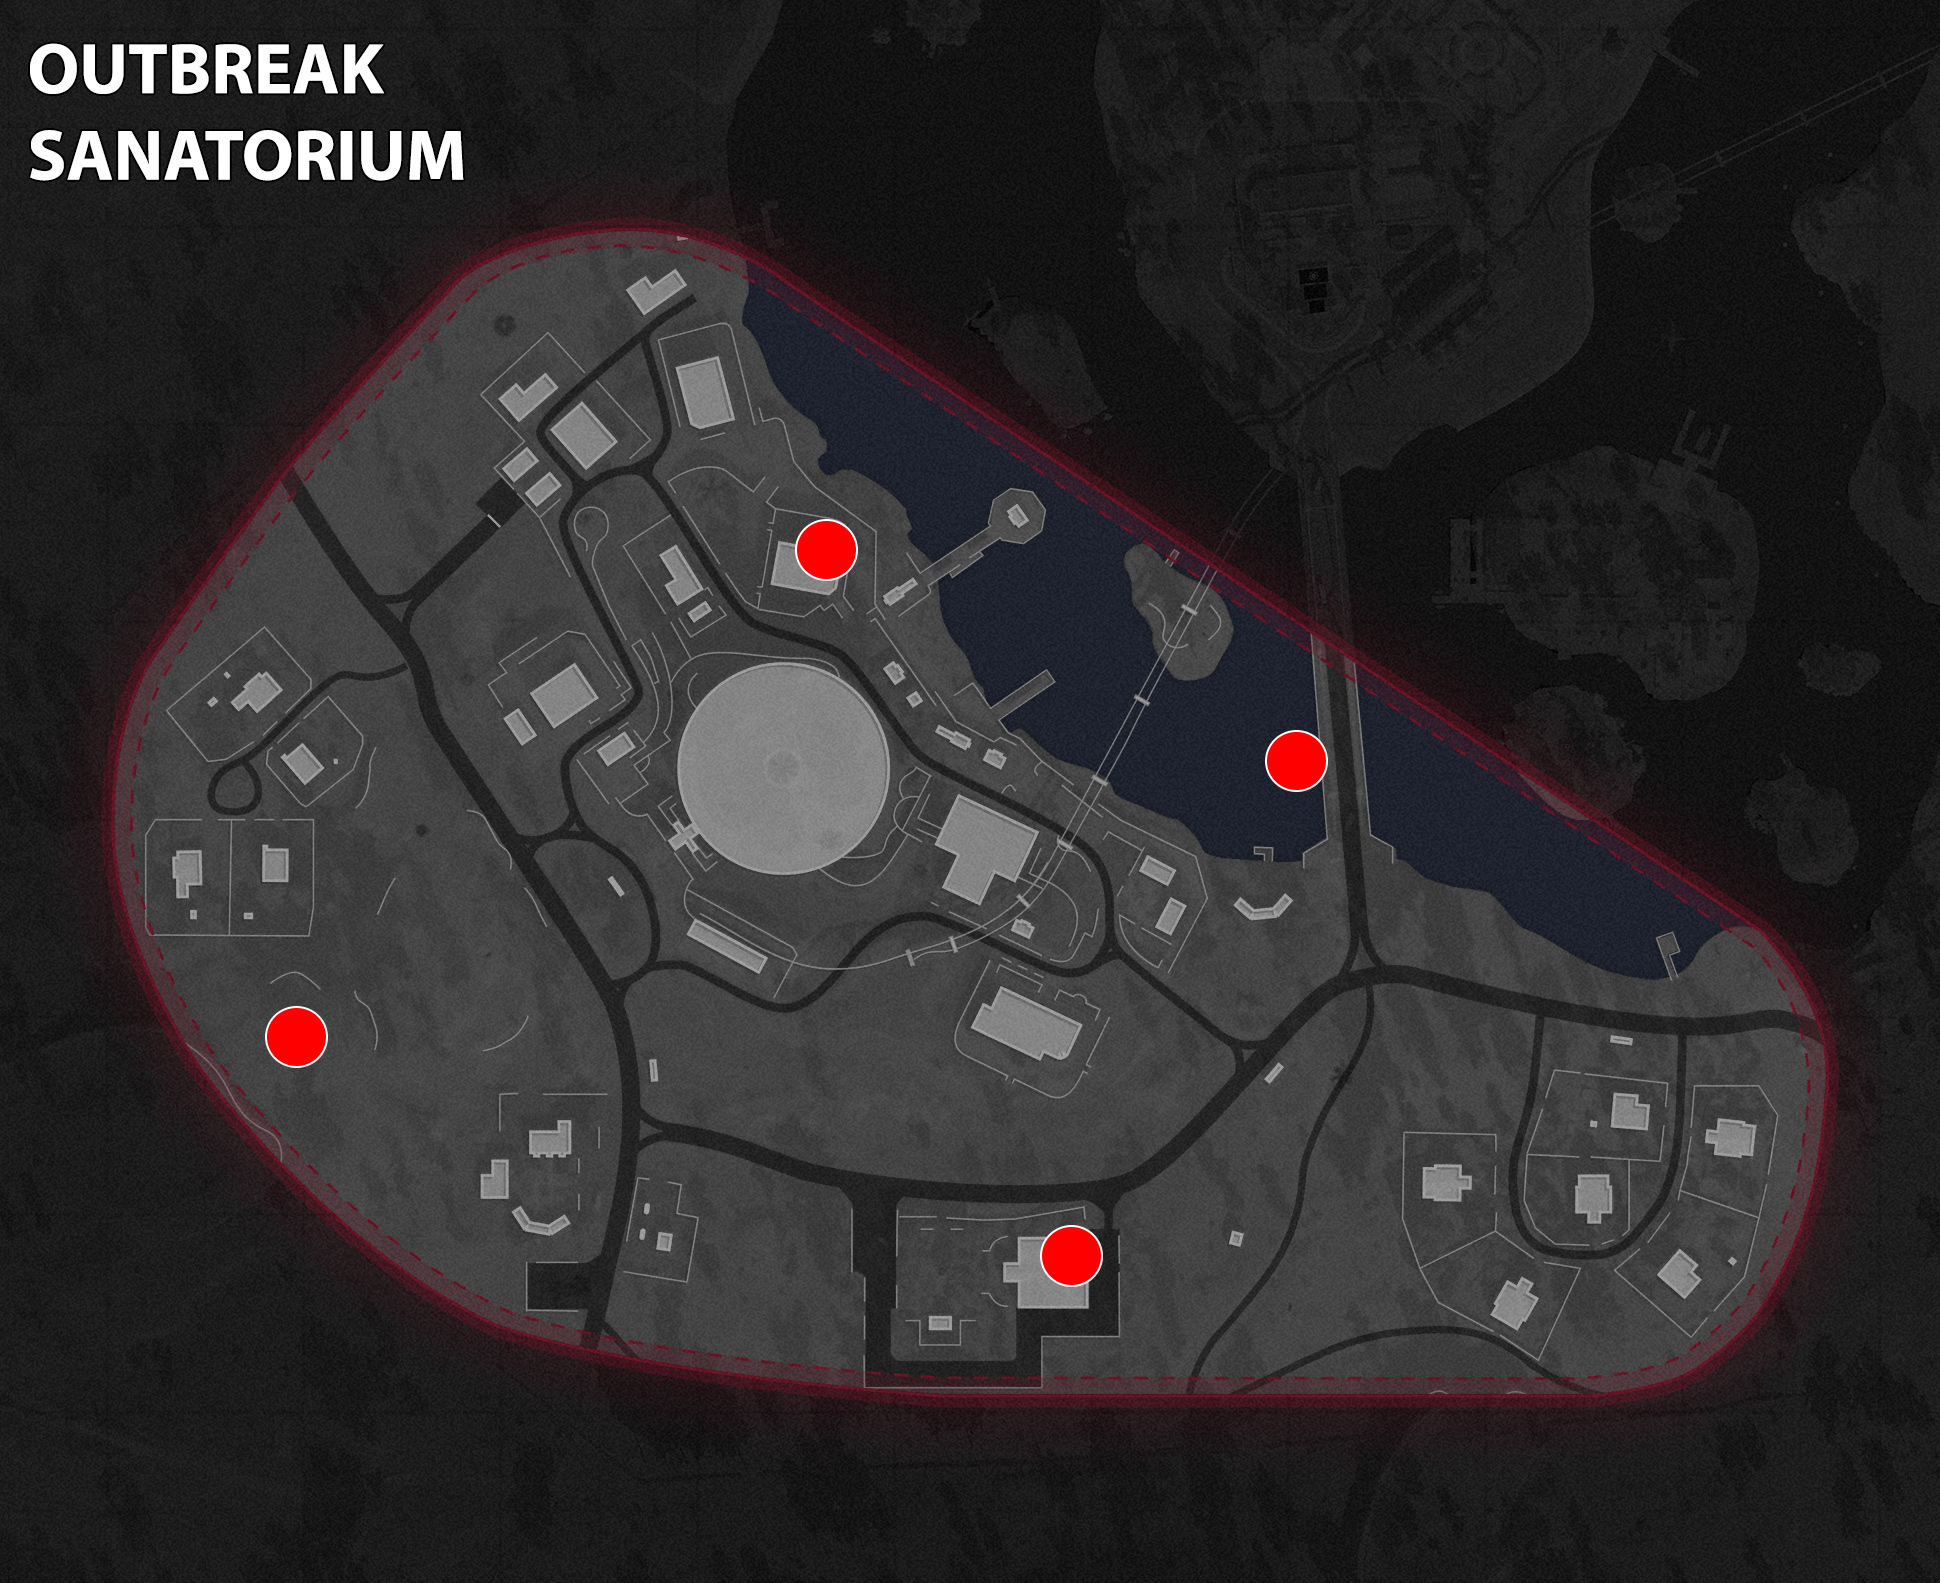
After starting round four, you'll need to find four monkeys (like the one above). Just like the radio amplifiers, there are four monkeys on each Outbreak map, so it doesn't matter which one you're on currently. I've marked the Outbreak monkey locations on each map to help you out. All you need to do is shoot them (there will be an M scrawled on the wall next to them) and grab the Microfilm Slides that drop afterwards.
Find the projector
With the Microfilm Slides safely in your possession, you need to find a projector and interact with it to examine some slides. Again, the location varies depending on the map, so here's where the projectors can be found on each:
- Duga: In the Admin Offices, on the white table.
- Alpine: On the top floor of the Lodge, near the green sofa.
- Ruka: In the Wunderfizz building, on the first floor.
- Sanatorium: In the meeting room at the bottom of the stairs of the Administration building.
- Golova: Head to Upper Town and into the Armor Station. Explore the rooms and you'll find the projector on a trolley in the middle of one of them.
Round Five

Head to the Missile Silos
Lift the Lockdown
Begin round five and you'll find yourself on the Ruka map. You have some time to loot the chests here, and complete some sidequests. When you're ready, head to the Missile Silos and walk through the hole in the wall to access the elevator. Press the button on the terminal and 'Objective Started: Operatsiya Inversiya' will pop up on screen.
Expect to meet lots of zombies in the silos. Exit the elevator and bear right, then run up the stairs, continuing all the way up to the top floor. Look for the corridor with the star on the wall above it, and run through it, then go past the green computer terminals. Make your way through the corridor beyond the computers, and just to the right of the pink archway ahead is a concrete pillar with 'A' painted on it. Drop down through the gap in the floor here to arrive on floor 'A-2'. Now run towards the terminals with the green maps on the walls. On the right side, towards the back of the room you can 'Lift the Lockdown' by using the terminal.
How to find the Launch Keys
Your new objective is to find three Launch Keys in the Missile Silos zone. You can find these in any order. Lots of Mimic enemies will spawn in the room that connects the silos, and they have hefty health bars, so take your time and clear as many of them as you can before looking for the keys.
Launch Key 1
There's a soldier slumped against the blue door down the corridor marked 'C'. They're holding an ICBM Launch Key but as soon as you try to take it, the soldier will turn into a Mimic called 'Ruzarkon the Twisted'. You need to defeat this creature to grab the Launch Key.
Launch Key 2
Next, it's time to pay Silo B a visit. On the ground floor, walk over to the red box—which is actually an Aetherium Harvesting Unit—under the big red star. Interact with the box, then explore the surrounding area and shoot the purple crystals that appear. Collect 20 Aetherium Crystal Chunks, then return to the harvesting unit to deposit them. Brace yourself for another zombie encounter, then retrieve the charged cylinder.
Run to Silo D and you'll notice that a big jellyfish with heavy Dark Aether vibes is lurking here. Head up the stairs behind it and pause on the platform that's covered in blue grass. Turn to face the jellyfish and use the Aetherium Field Upgrade (the canister you just charged). You'll be pulled towards the creature. As you float downwards, grab the Launch Key suspended in the air.

Launch Key 3
That's two keys down, so let's get the third. Make your way to the ground floor in Silo A. Run through the tunnel with the red lights and retrieve the Essence Trap (its a green and yellow package next to the blue barrel).
If you listen carefully you'll be able to hear a monkey in the vents in the main room. Scour the Silo walls for a vent that's glowing blue and toss the trap so it lands near it. Avoid standing too close to the monkey as you'll scare it and it'll run away. Once the trap glows blue, double tap F to lock it. The trap should now be glowing purple instead. Walk up to it and grab the final Launch Key.
Start the Launch Sequence
Your next challenge is to reach the launch consoles in Silos A, B, and D to insert the keys. On the top floor, look for a large room with two rows of grey computer terminals, and a large green map positioned on a large screen above.
As always, watch out for zombies ambling around these rooms, but bear in mind that you need to complete this task in under 30 seconds to initiate the launch sequence. You'll also need to work out what the order is when inserting the keys (this changes every time). Don't sweat it if you don't ace this part on your first try, the puzzle resets and you can try again shortly afterwards.
Once you're ready to fight the boss, head upstairs to the Exit Door and leave the facility. You'll find yourself in a paved area where Legion will spawn momentarily.
Legion boss fight
How to defeat the Legion boss
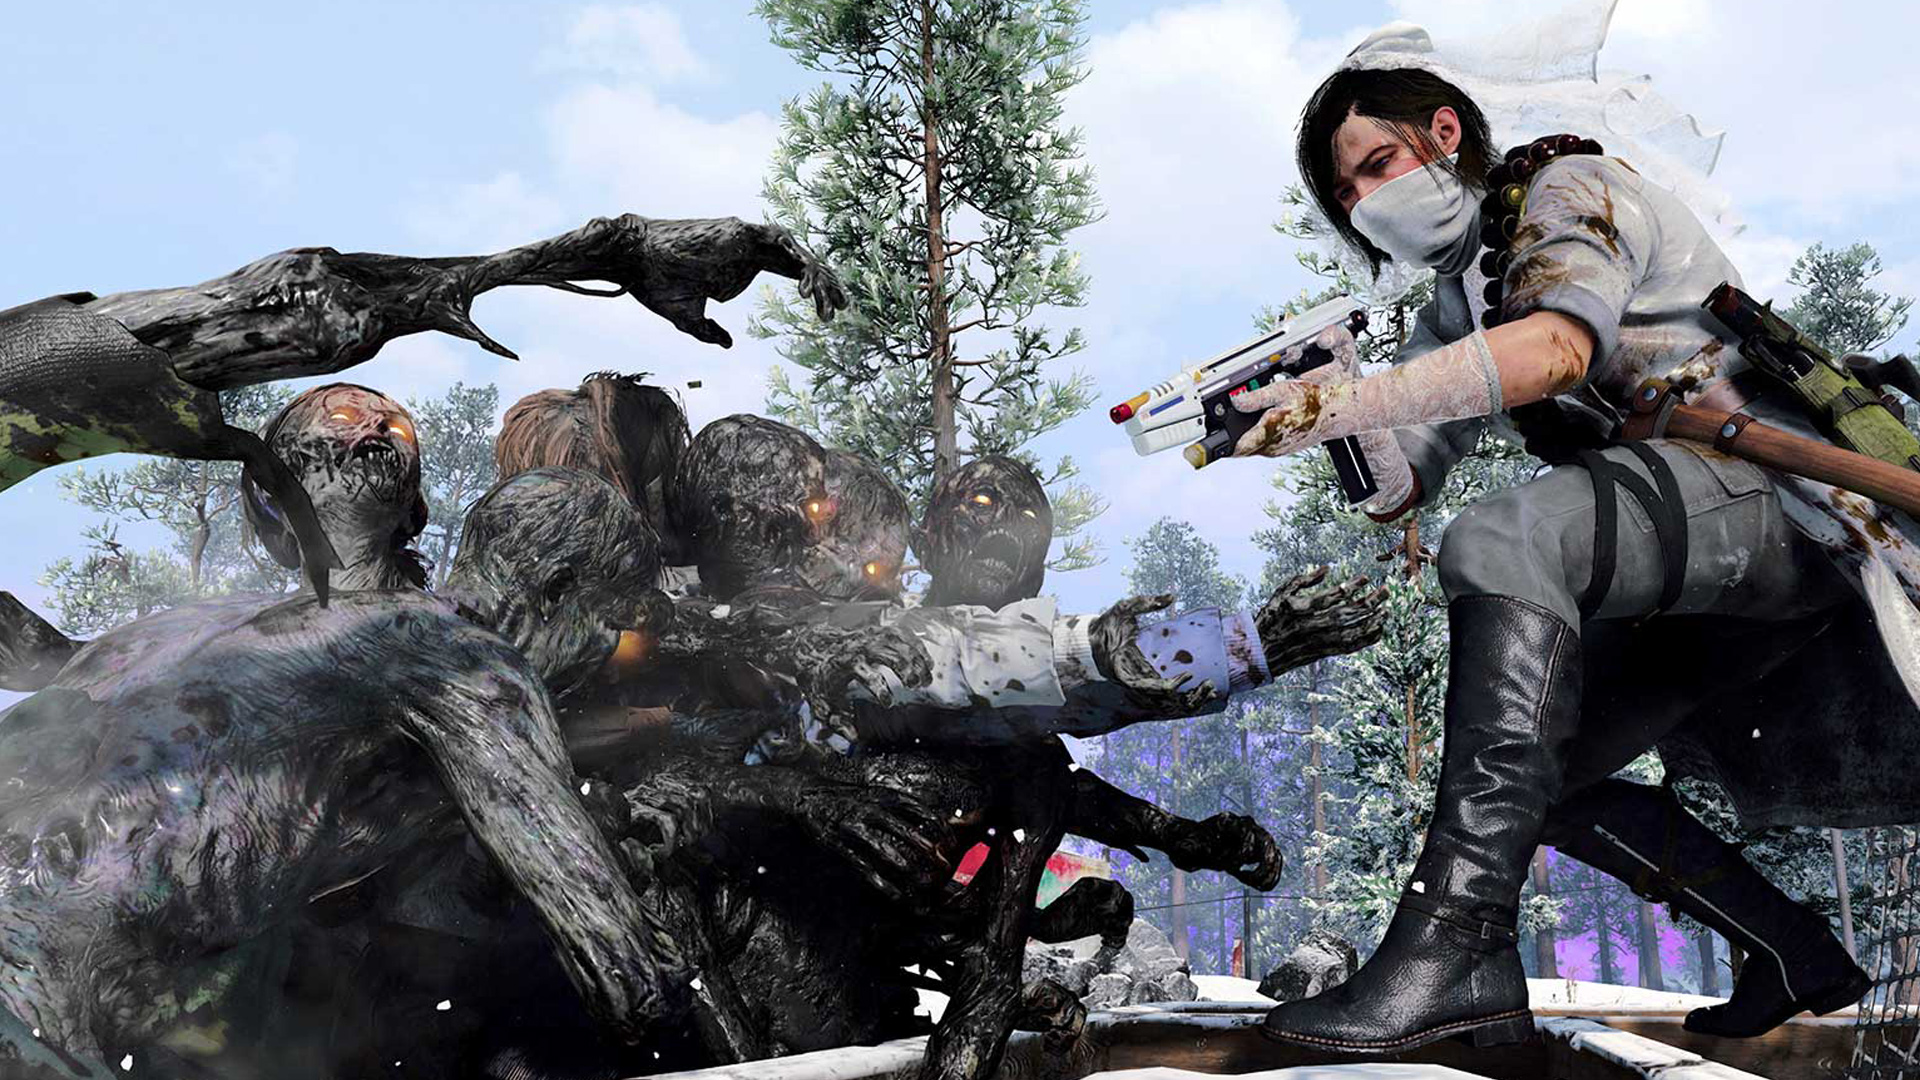
Before we take on Legion, remember that there will be lots of zombies in this tight space, so you won't be able to give the boss your full attention the entire time. If you find that you're taking too much damage from Manglers and Mimics, take care of them before switching back to Legion. That said, you only have nine minutes to defeat Legion and finish the Main Quest.
Legion is a huge entity that'll float above you in the arena. To begin with, the weak spot is in its torso, so I recommend directing all your fire power there. The boss has electrical attacks, so keep your distance as much as possible. After a while, the boss will move to another corner of the map and it'll look as though it's tethered to three electrical orbs. When these appear, concentrate on shooting them instead. Legion will alternate between these phases until you take it down.

Morgan has been writing for PC Gamer since 2018, first as a freelancer and currently as a staff writer. He has also appeared on Polygon, Kotaku, Fanbyte, and PCGamesN. Before freelancing, he spent most of high school and all of college writing at small gaming sites that didn't pay him. He's very happy to have a real job now. Morgan is a beat writer following the latest and greatest shooters and the communities that play them. He also writes general news, reviews, features, the occasional guide, and bad jokes in Slack. Twist his arm, and he'll even write about a boring strategy game. Please don't, though.
