9 Kick-Ass DIY Projects to Get Your Hack On
Create a Battery-Powered USB Charger
Nothing can ruin a nerd outing faster than a catastrophic battery failure in one of your vital gadgets. Fortunately, although you may not always have access to an outlet and a wall-wart to recharge, it’s possible to create an emergency backup battery that fits inside a common Altoids tin and can power your toys for at least a few extra minutes—all for just a couple of bucks.

Gather the Parts
First, you’ll need to find a suitable casing for your USB charger. A perennial favorite of amateur gadgeteers: Altoids-style tin boxes. They’re cheap, sturdy, and relatively attractive. The traditional tin, about as big as a deck of cards, provides ample room for the components we’ll be using, but if you’re ambitious, it’s also possible to cram them into the newer, small Altoids tins.
In addition to the tin, you’ll also need the following parts. The total cost of parts (sans tools) should be only a few dollars, but you’ll either have to do some scavenging or place an order online to get some of the components.
- A 9V battery clip
- A +5V voltage regulator
- A female USB connector
- A 9V battery
- Insulated copper wire
- Soldering equipment
- A Dremel tool
Cut the Altoids Tin
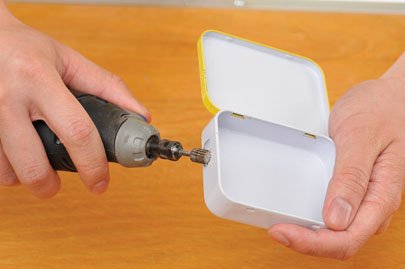
To start, we need to make a hole in the side of the tin big enough to hold the female USB connector (image A). When done, this is where you’ll plug in your gadgets; it will be the only visible difference between your charger and a run-of-the-mill Altoids tin. Make the hole on one of the narrow ends of the tin, a little to the left or right of center. We used a Dremel to make our hole, though you can also do it with a drill or a hand file. Try to make the hole just big enough for the connector to fit into, and no bigger.

Wire the Circuit
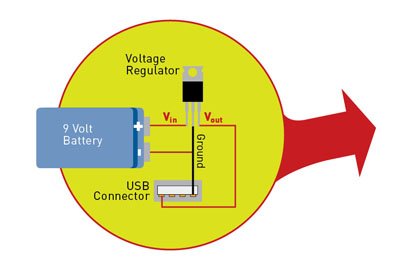
Next, we’ll need to put together the circuit that will allow us to charge USB devices (which need about 5 volts) with a 9-volt battery. If electrical engineering sends you into a cold sweat, don’t worry; this is about as simple as a circuit can get. We’ll be connecting the positive (red) wire from the battery clip to the Vin pin on the voltage regulator, and the Vout pin to the +5V pin on the USB connector. We’ll also connect the ground wire from the battery clip to the ground pin on the regulator and the USB connector. Confused? Just solder everything together according to the diagram (image B).

Complete the Package
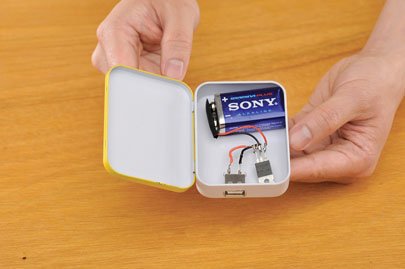
After you’re done soldering, wrap the connections in electrical tape so they don’t short out as we install the circuit in
the tin casing. Since both the battery clip and voltage regulator are smaller than the USB connector, you should be able to feed them through the hole first, and then fit the USB connector into it so that the lip of the connector rests on the edge of the hole. Once you’ve got everything tucked neatly into the case, with the voltage regulator sitting beside the connector, use some hot glue or epoxy to hold the wires in place.

(image B)
The biggest gaming news, reviews and hardware deals
Keep up to date with the most important stories and the best deals, as picked by the PC Gamer team.

