9 Windows 11 settings we recommend changing
Make your PC life a little nicer.

I started using Windows with Windows 3.1 in the early '90s, as a kid barely enough to see over the keyboard. As the name implies, that was hardly the first version of Windows. Over the course of 40 years Microsoft's operating system has changed a lot, of course, but you might be shocked how many features, settings, and buried menus in Windows 11 and Windows 10 date back to much earlier versions of the OS. With each new iteration there are new surprises... and old ones. That's what I'm here to dig up.
None of the settings we're highlighting here are essential to using Windows, but they can make it a more pleasant experience. Taking a minute to tweak a thing or two can save you time in your day-to-day Windows usage and sand down some daily annoyances, too.
By default, Windows has several settings disabled that we recommend switching on, and you'd probably never know about them unless you spend an awful lot of time poking around menus. Now you can skip that part and get straight to the Windows settings you should be tweaking.
- Kmode exception not handled: What it is and how to fix it
Speed up how you sign-in to your PC
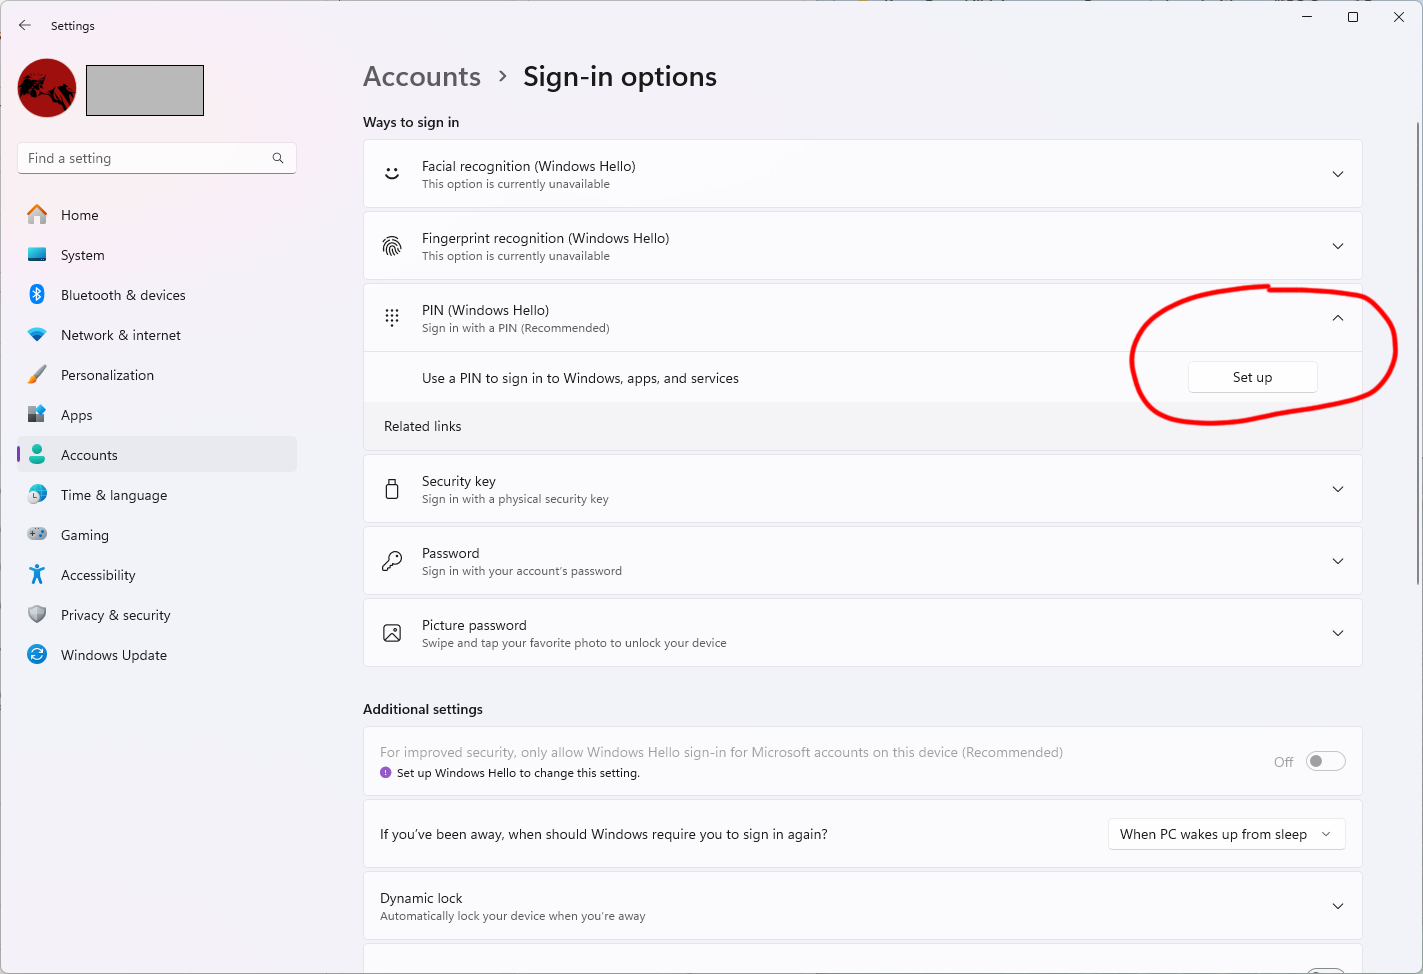
For security reasons, Microsoft discourages the use of passwords these days, instead encouraging the use of a pin number (or, if you're on a laptop, a biometric login like a face scan).
Given that security breaches across the web seem to leak billions of our passwords into the dark corners of the internet every few months, I'd recommend using a pin: a set of four numbers to quickly tap before you're back into Windows.
- To do that, head to Windows Settings by tapping the Windows key on your keyboard and typing "Sign-in," then pressing Enter on the first result.
- You should now be in the Accounts > Sign-in options panel.
- There are several options here, but Windows Hello PIN is what you want to choose. Click the drop-down and hit Set up to create a pin.
Turn off Sticky Keys
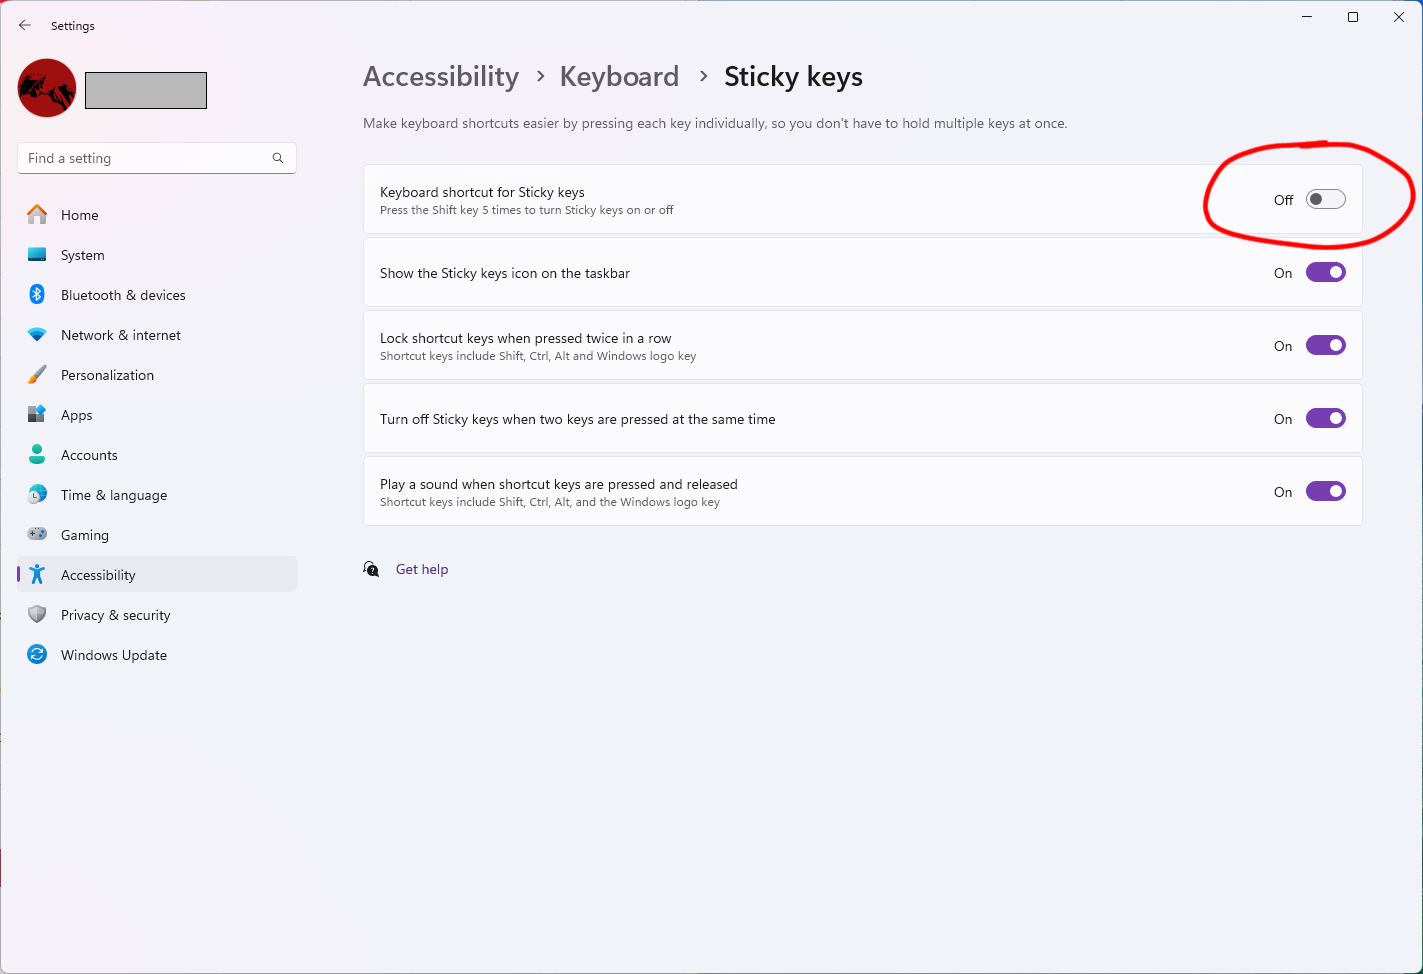
If you're a veteran PC gamer, you've likely encountered Sticky Keys before. It's the Windows feature that's made for people who can't hold Ctrl or Shift while pressing something else. It's a useful accessibility feature, but if you don't need it, it can get in the way. Games often require or encourage you to press Shift several times in succession, which can cause the Sticky Keys prompt to show up and ask if you'd like to enable it, derailing whatever you were doing in the moment.
- To prevent that prompt from showing up at all, press the Windows key and type "Sticky Keys" to jump straight to this settings menu.
- Under Keyboard shortcut for Sticky Keys, flip the switch to the left to turn the feature off.
Add folder icons to Windows 11 Start menu
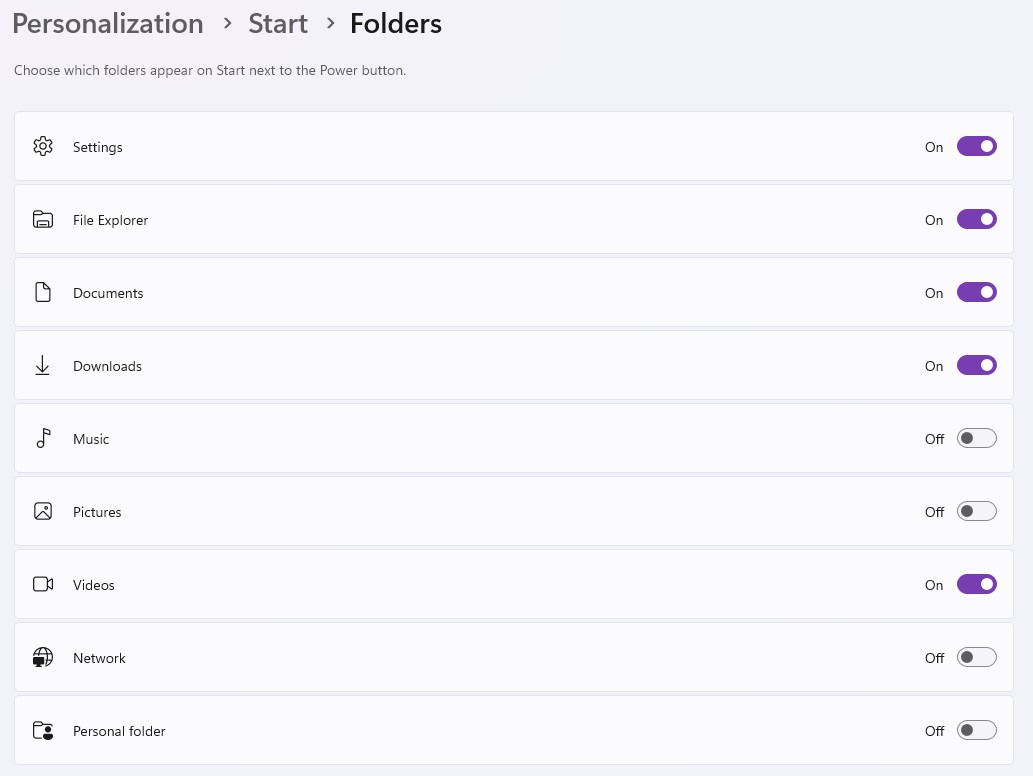
If you habitually find yourself opening up File Explorer to then navigate to your documents or downloads, this can save you a step. Somewhat hidden in the Windows 11 Start menu personalization settings is the option to add folder icons for each of your default file folders.
- Click the Windows icon and then type "Settings" to pull up the menu.
- On the Settings page, select Personalization and then Start from the list of options.
- On the Start page, select Folders. Once in the Folder settings, choose which icons you'd like to appear on your Start menu next to the power icon. If you're like me, Downloads is one you'll click regularly.
Turn on Dark mode
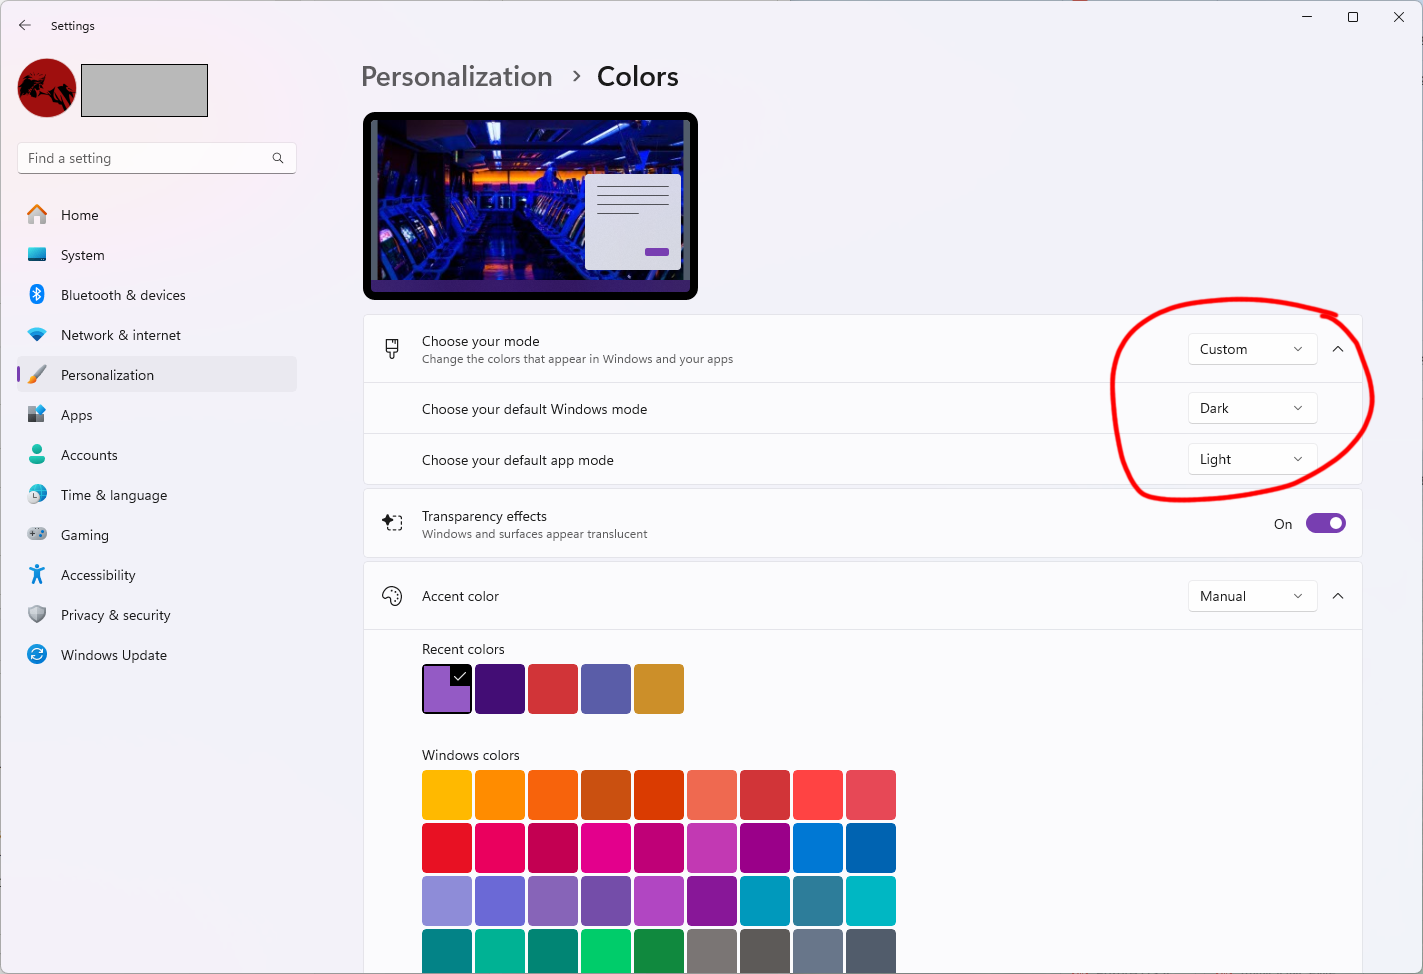
Dark modes change the contrast of your application windows and backgrounds, and is a near-essential change if you're habitually computering in a dark room where the light from a white screen can be blinding. Or if you're just spending very, very long hours staring at a monitor.
The biggest gaming news, reviews and hardware deals
Keep up to date with the most important stories and the best deals, as picked by the PC Gamer team.
By default, Windows uses a light mode. You can change it so that everything on your PC obeys the dark mode code and respects your precious eyes. You can also mix and match by having Windows' own UI set to dark mode but applications default to light mode, or vice versa.
- Press the Windows key on your keyboard and then type "Dark Mode" to jump straight to this configuration screen in the Settings menu.
- Once you're on the Personalizatrion > Colors page, change the dropdown under "Choose Your Mode" or individually change the "default Windows mode" and "default app mode" options.
Show hidden files and extensions
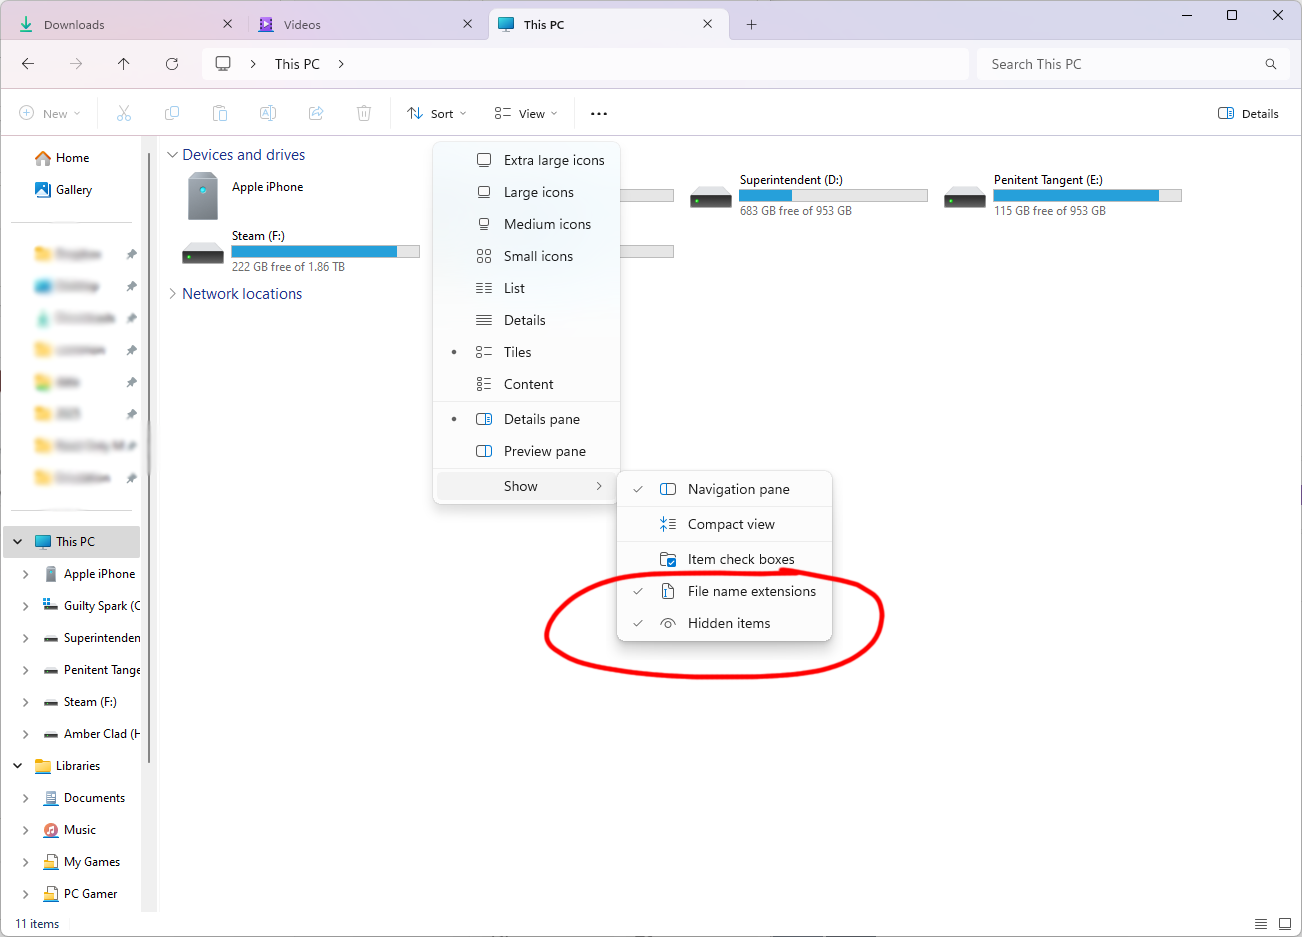
Windows doesn't want you to see some of the vital folders in your PC. There are times where you need to, though, especially if you dabble in modding games or just generally like tinkering with your PC. The AppData folder is an essential one; it's where a lot of game data is stored and the place you often need to dig through to solve issues with your programs. And if you're ever trying to deal with odd files, like a video that can't play or an image you can't get to upload to social media, being able to see (and easily change) a file extension can be very helpful.
- To pull the sheet off of these files and extensions, open File Explorer from the Start Menu.
- At the top of File Explorer, select the View tab follow by the Show menu option and check both "File name extensions" and "Hidden items."
- Now you can see file extensions and also navigate to the holy C:\Users\[username]\AppData folder where you'll often find game save and config files.
Enable Clipboard history
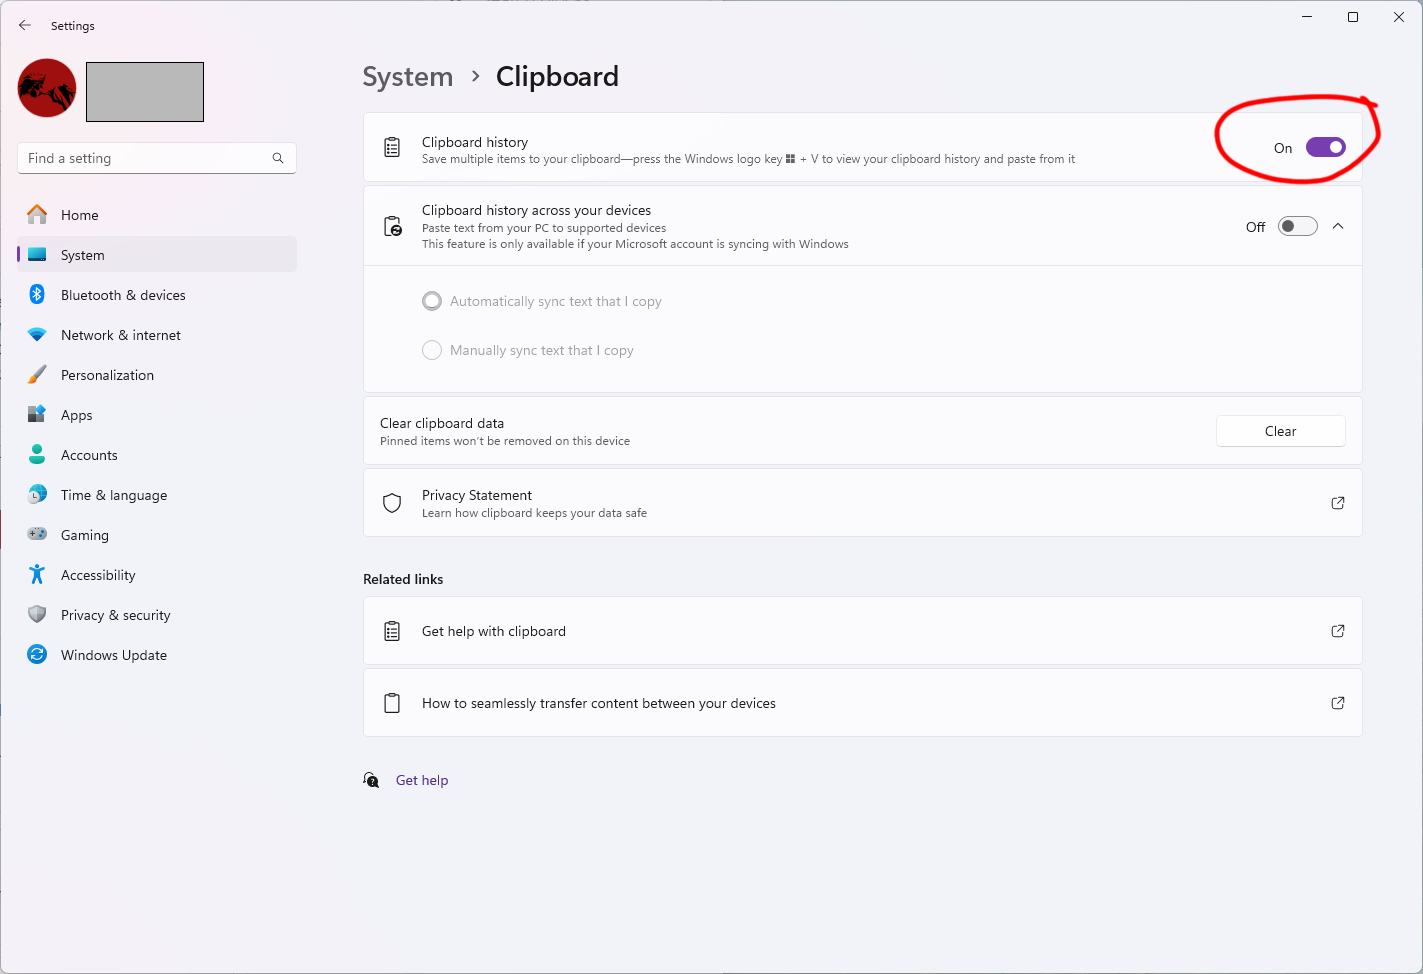
Normally when you copy and paste things like text and links, Windows only lets you paste the most recent one. There's actually a name for where the things you copy get saved: the Clipboard. In Windows 10 and 11, you can enable Clipboard history to bring up a window of the last several things you've copied to make copy/pasting extra convenient.
- To enable Clipboard history, hit the Windows key and type "Clipboard" to jump straight to Clipboard settings.
- Flip on Clipboard history. Optionally, you can also turn on clipboard history across all the computers you're signed into with the same account (like a desktop and a laptop).
- To bring up the window for your clipboard history, press the Windows key and V.
Turn off recommendations and ads in Start menu
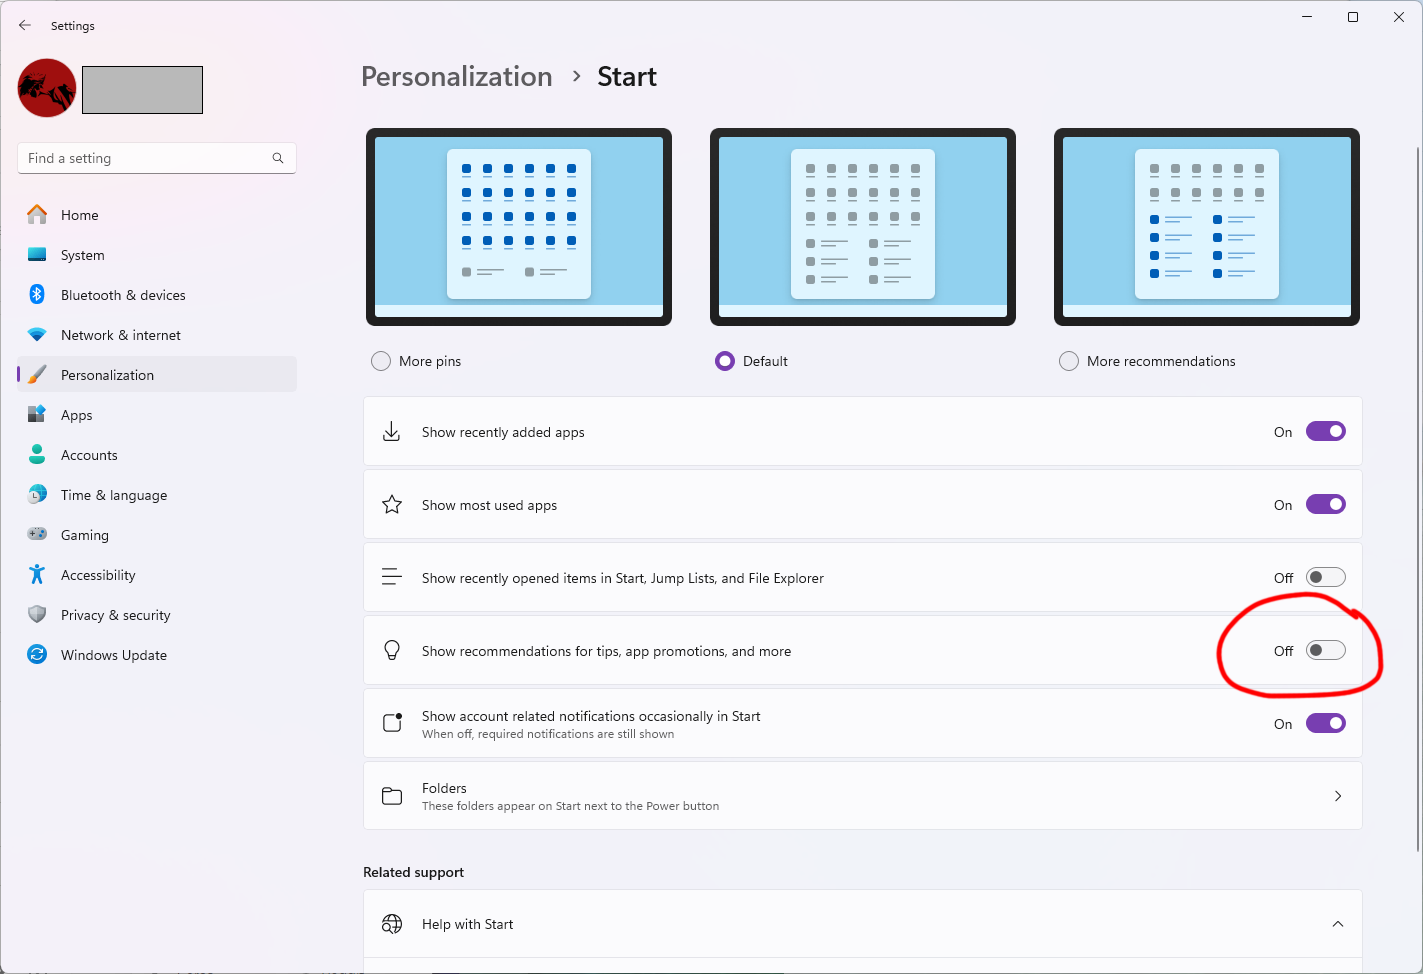
Windows likes to show you "helpful" tips in the Start menu, like "Buy Microsoft Office!" or "Subscribe to OneDrive!" It can clutter up your preferred list of apps and make it tedious to get to what you want—especially if you're someone who doesn't habitually hit the Windows key and type the name of the program you want.
- To turn off Start menu promotional nonsense, hit the Windows key and type "Start settings." Hit Enter.
- In the list of toggles, look for "Show recommendations for tips, app promotions, and more" and turn it off.
Enable Windows' built-in blue light filter
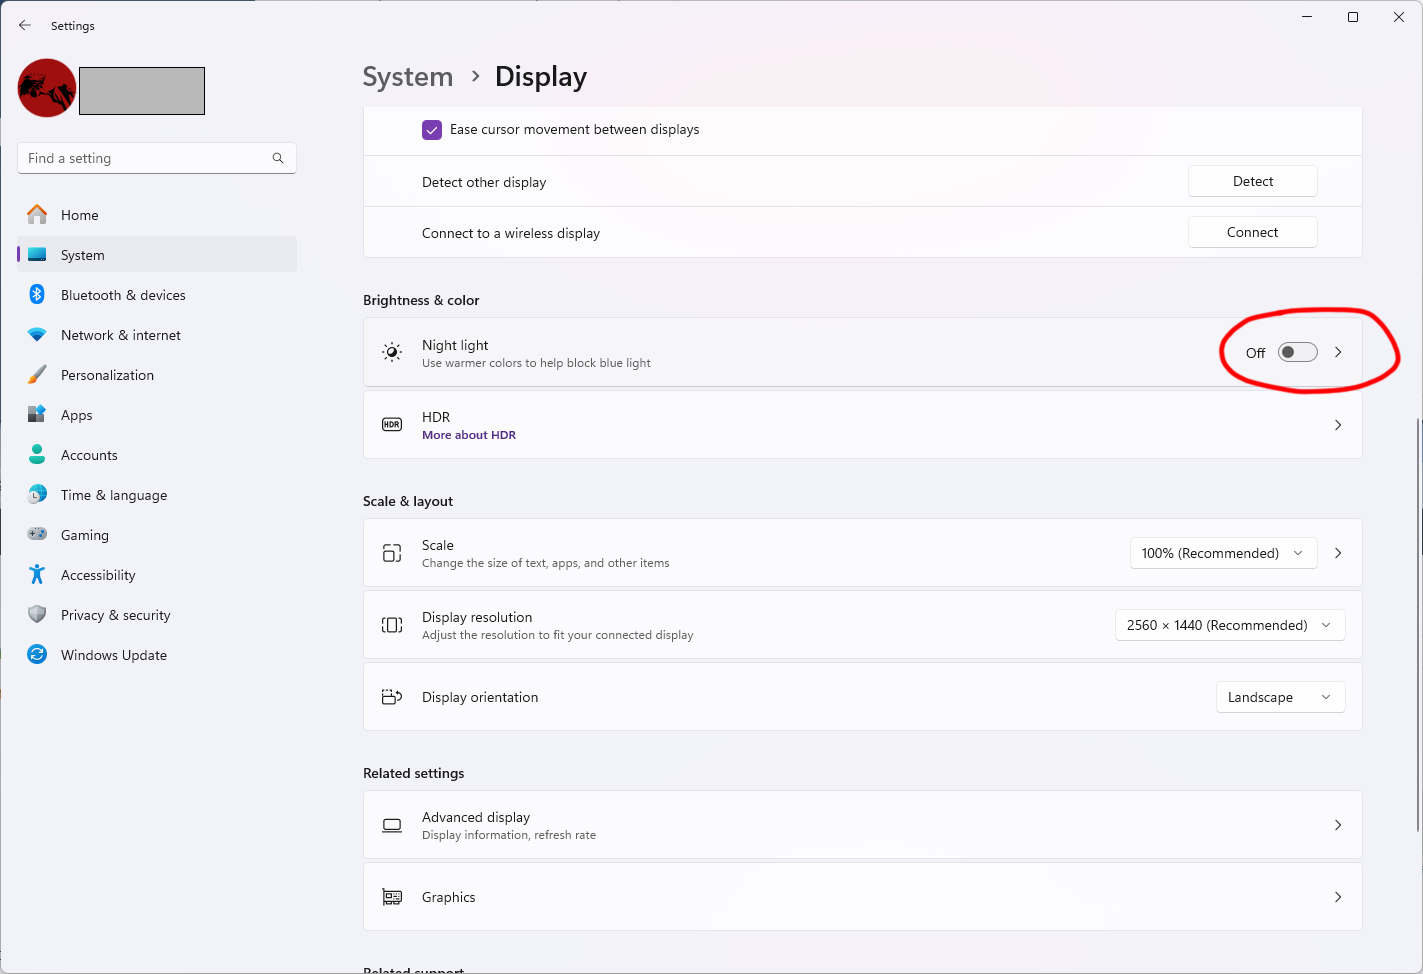
Whether or not blue light from screens is seriously detrimental to our poor eyes and brains is unclear, but using features that tint your screen to warmer colors can at least be relaxing for your eyes after hours on your PC. Windows now has this feature built in, though you may prefer to extra options of long-time free favorite Flux.
If you want to use the Windows version, though:
- To turn on Windows' Night light feature, press the Windows key and type "Display." Hit Enter.
- Scroll down to the Brightness & color section and toggle on Night light.
- Click Night light settings after enabling to play with the strength of the tint and the schedule for when it'll turn on. You can configure the time manually, or set it to automatically run from sunset to sunrise based on your location.
Enable dynamic refresh rate on laptops in Windows 11
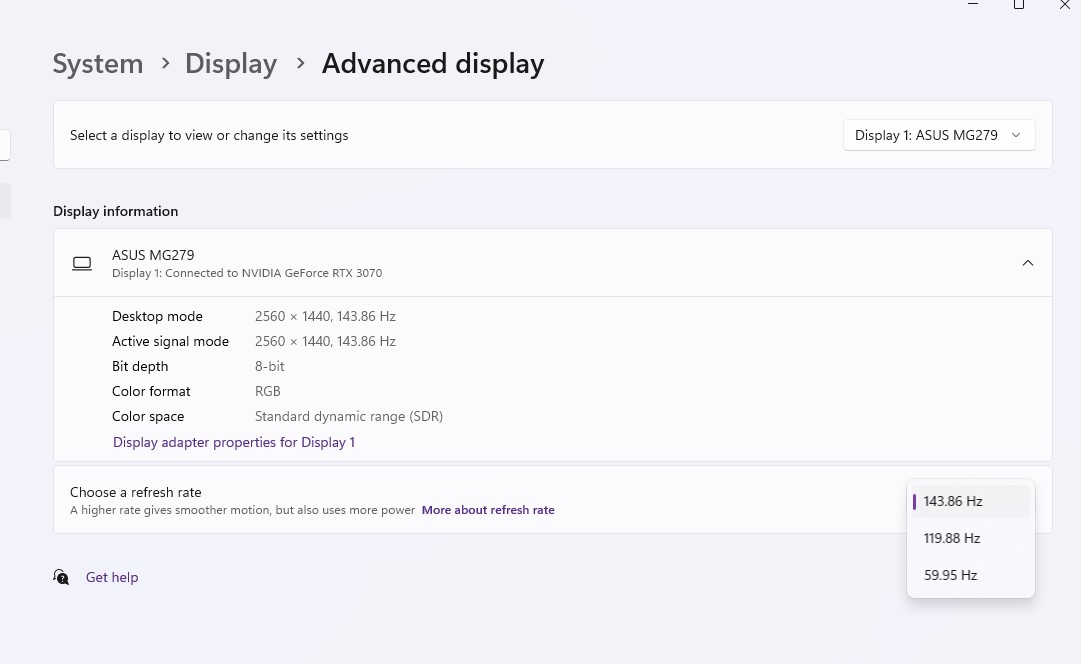
Like a lot of smartphones today, some modern laptop displays are capable of dynamically adjusting their refresh rates, which is useful for saving battery life. While gaming you obviously want that full 144Hz refresh, but if you're staring at an unchanging document for minutes at a time, you're just wasting juice by having your screen refresh itself so many times per second. Why not dial the refresh rate down to, say, 60Hz when nothing's moving?
Windows 11 actually supports this feature, if you go digging into the advanced display settings.
- Press the Windows key and type "Display" to jump to the Display settings.
- Scroll down to Advanced display and click it.
- In the Advanced Display menu, look for "Choose a refresh rate" and click the dropdown to the right. If your monitor supports a dynamic refresh rate, you'll see it listed in the options here.
Bonus: hidden Windows features
Windows has been around for a while, and there are a lot of features it doesn't advertise that can save you time if you know about them. Here are a few favorites:
- You can jump directly to your desktop with one button by pressing the vertical section on the bottom right-hand part of your taskbar. You can also press the Windows key + D.
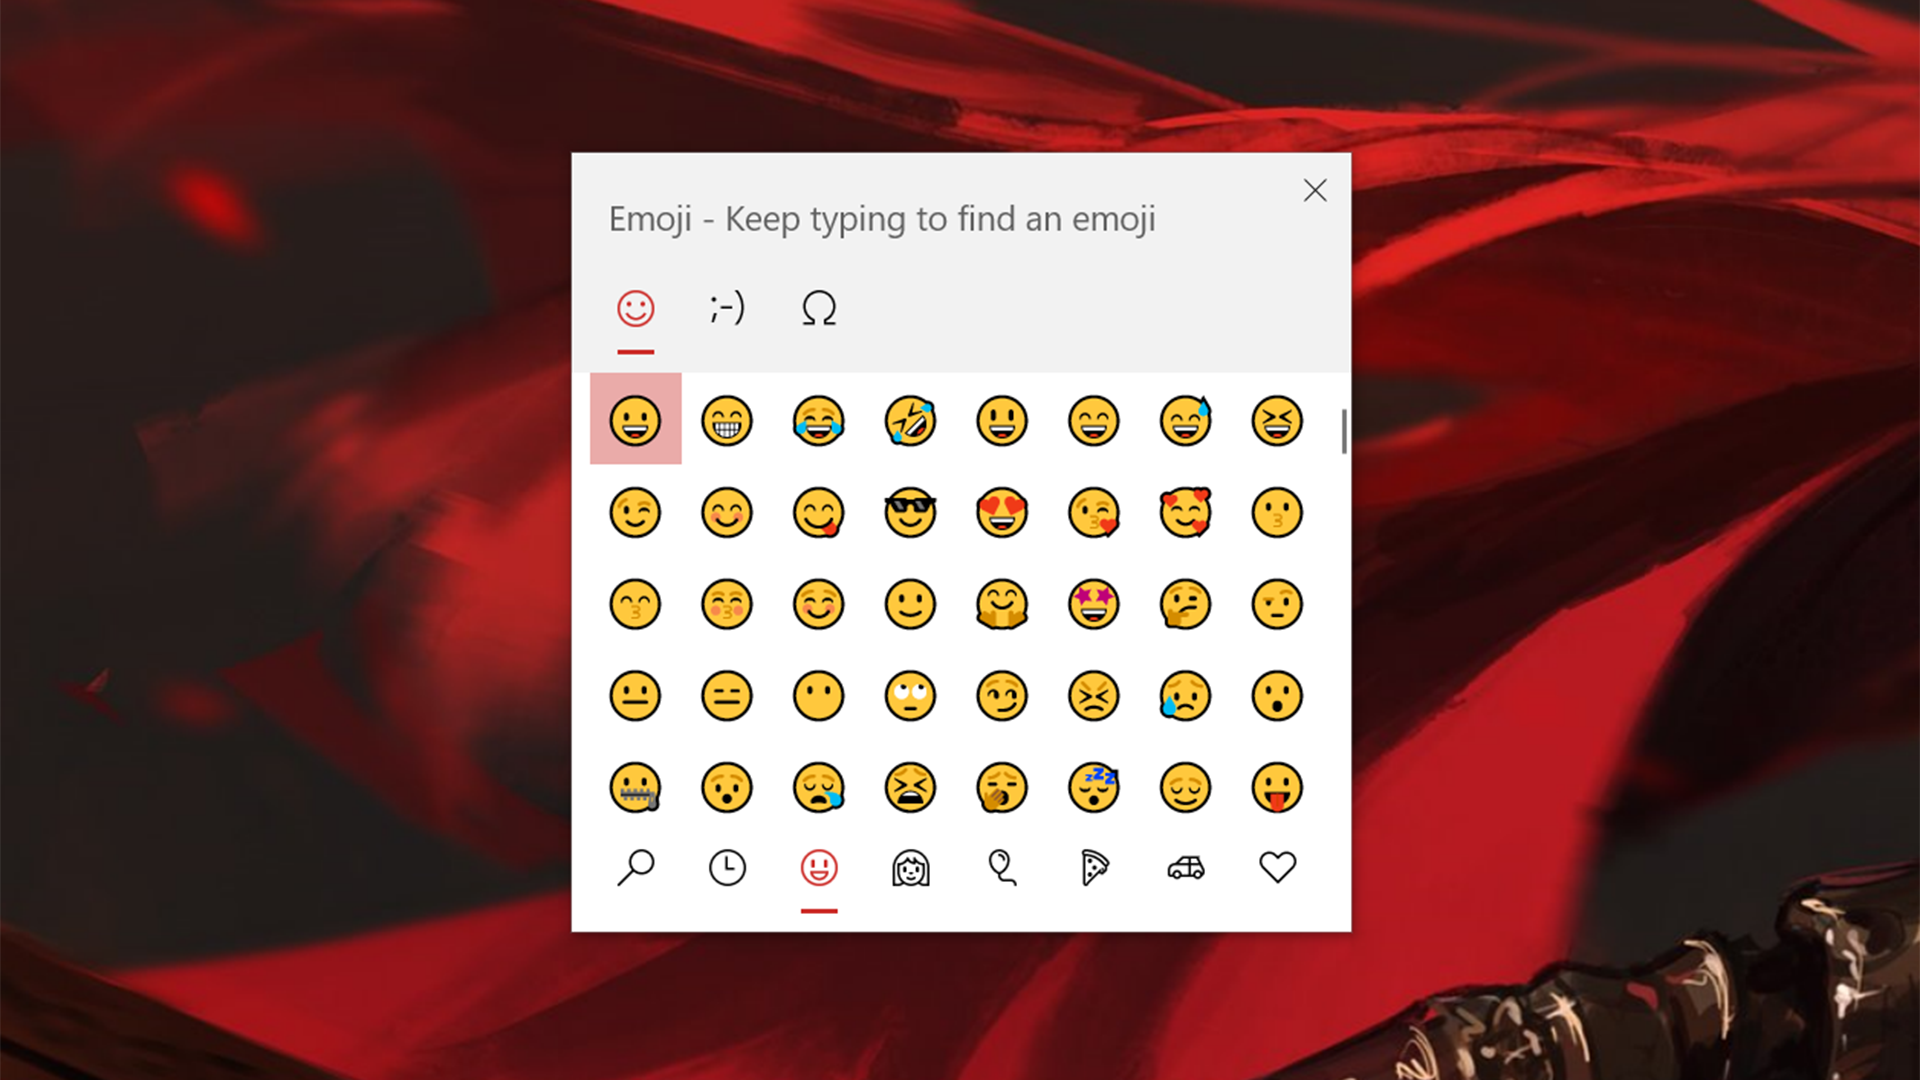
- You can send emojis at any time by bringing up the Emoji Picker with Windows key and the period or semicolon key.
- You can take screenshots by pressing Windows key, Shift, and S at the same time.
- You can minimize all windows except the one you're focused on by clicking and holding the top of an active window and shaking it with your mouse.
- You can alt-tab and see all your current open windows by hitting Windows key and Tab.
Tyler has covered videogames and PC hardware for 15 years. He regularly spends time playing and reporting on games like Diablo 4, Elden Ring, Overwatch 2, and Final Fantasy 14. While his specialty is in action RPGs and MMOs, he's driven to cover all sorts of games whether they're broken, beautiful, or bizarre.
- Wes FenlonSenior Editor
